Until you spread your wings; you’ll have no idea how far you can fly.

– Napoleon Bonaparte.
– Napoleon Bonaparte
 thenthidal | தென்திடல்


The GnuCash application doesn’t have a built-in payroll processing module. However, this is the same scenario as you might encounter when dealing with other commercial accounting /bookkeeping software such as Sage 50 or Quickbooks. In the case of most of the commercial accounting software packages, you might have to pay extra to get the payroll module added.
In the case of GnuCash, the general approach to handle payroll is to calculate the payroll taxes and deductions separately using Excel as well as other tools and then use GnuCash for tracking payroll expenses and liabilities. This will be okay for companies employing a small number of employees (e.g., 1 to 10).
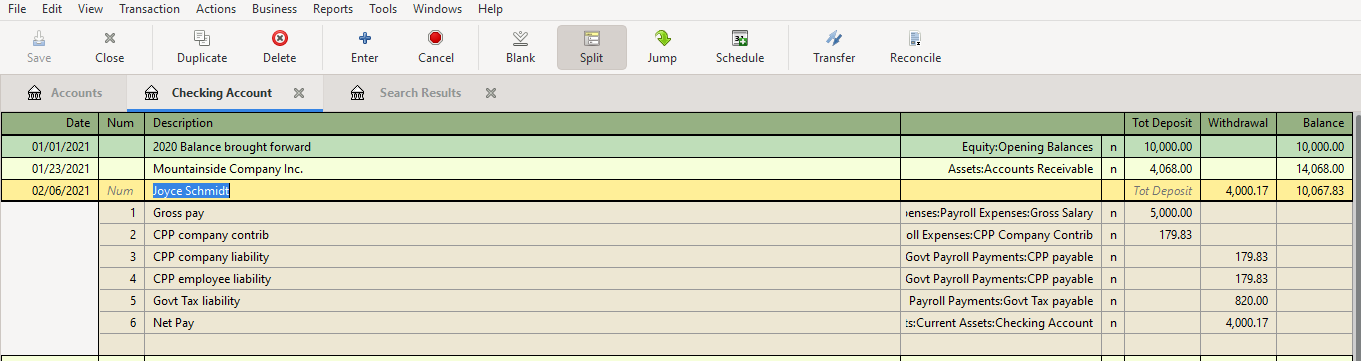
Let us describe how to do this with the help of a small business based in Ontario, Canada. Let us assume that “Joyce Schmidt” and “Jacob Bright” are two fictitious employees of the fictitious company “I.T. Software Professional Consulting”, who receive monthly salaries of CAD 5000 and CAD 2000 respectively. Their payroll tax and deductions can be calculated using Canadian tax authority (CRA)’s online tools. We can keep an Excel spreadsheet which shows the deductions and other details such as how much the company has to contribute, etc. Following picture shows sample data for a month:

The following steps describe how GnuCash is updated with the above payroll information.
1] Let us create the expense accounts to keep track of Gross Payroll expenses, another one to track company contribution to CPP and one more account for tracking company contribution to EI premium.
Expenses:Payroll Expenses:Gross Salary
Expenses:Payroll Expenses:CPP Company Contrib
Expenses:Payroll Expenses:EI Company Contrib

2] We also have to create liability accounts in order to track the amount of payments to be made for taxes as well as for CPP and EI premiums.
Liabilities:Govt Payroll Payments:CPP payable
Liabilities:Govt Payroll Payments:EI payable
Liabilities:Govt Payroll Payments:Govt Tax payable

3] Open the checking accounts register and create a new entry for first employee with the name of the employee in the “Description” field. Then, click on split button and then enter the transactions as in the screenshot below. Then click save and then click “Split” icon to compress the transactions to a single row.
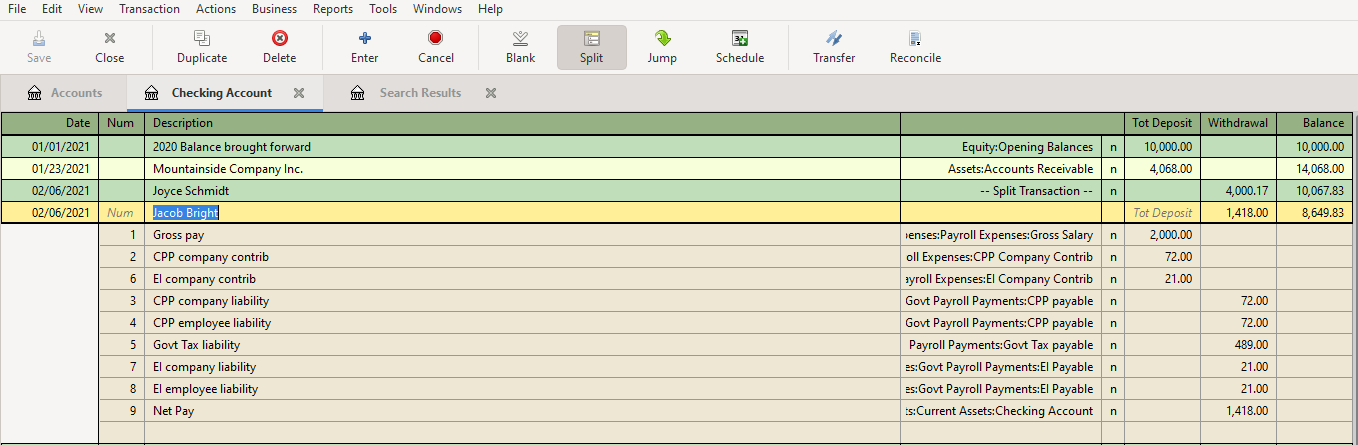
4] Click on the payroll transaction row of employee Joyce (step 3) and click on “Duplicate” button to duplicate the transactions on the next row. Click on the newly created row and then click “Split” icon to open all transaction rows. Edit the rows to update the transactions for the second employee as shown below. Save it.
5] Open the chart of accounts and then take a look at the “Expenses -> Payroll Expenses” to view the total cost to company due to payroll expenses

6] At the chart of accounts, select “Liabilities -> Govt Payroll Payments” to view the liability payments to be made to the tax authority

7] In order to view the payroll information of a specific employee, from the top menu, select Edit -> Find and then type the name of the employee (e.g. Jacob), which will display the details.
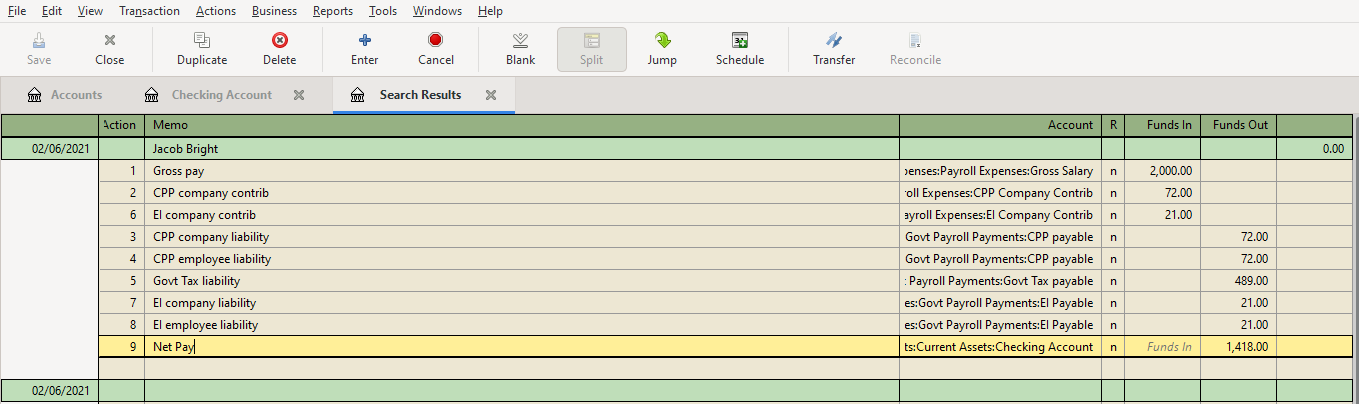
8] With the window of step 7 open, click on “Reports -> Account Report”, to get a printable view of the employee’s payroll information

It is also possible to use the check printing capabilities of GnuCash to print the employee payment check. You might want to take a look at File -> Print check option.

In the previous post, we showed how to synchronize the local repository with the remote repository located at Bitbucket cloud. For that we used a single branch called “master” locally and a branch called “origin/master” remotely. This branch can be shared with other users so that they can also clone the repository and do their work in their machines. Once they are done with their updated files, they can stage, commit and push it to remote branch. However, in a business I.T. development environment with multiple users are working together, it would be better to keep multiple branches. This would keep the work flow streamlined into the different stages a project goes through.
Usually a project starts at the development (DEV) phase, then goes to quality analysis (QA or testing) phase. Once testing is completed, it can move to pre-production (PREPROD) phase and then finally to the production (PROD) phase which is the final destination of the project where it accomplishes its intended purpose. There could be few more additional stages in this type of work flow, but the DEV, QA and PROD are the most commonly used ones.
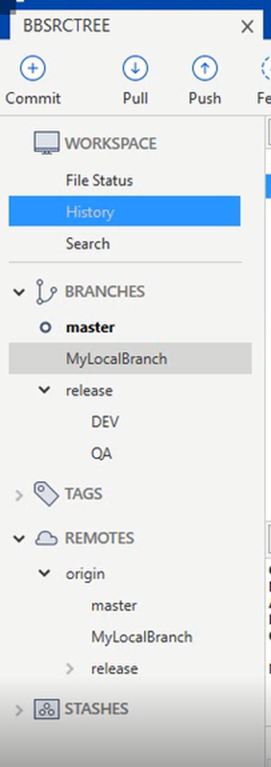
We should also note that when operations team notice any issues with the applications running at production, they might refer back to the developers, which will again trigger another set of development, quality analysis and production phases. The following screenshot shows some of these branches used in a typical environment. In order to keep up with these commonly used phases we can have branches release/DEV, release/QA, master (PROD). Also to keep a personal local branch, we can also have a purpose/task driven name such as “MyLocalBranch” or a branch with a reference number, etc. The following screenshot shows how the branches have been created with our sample scenario.
Let us create a branch locally at sourcetree and then sync to remote (Bitbucket cloud). It is also possible to create branches at bitbucket cloud and then sync them as the local sourcetree branches.
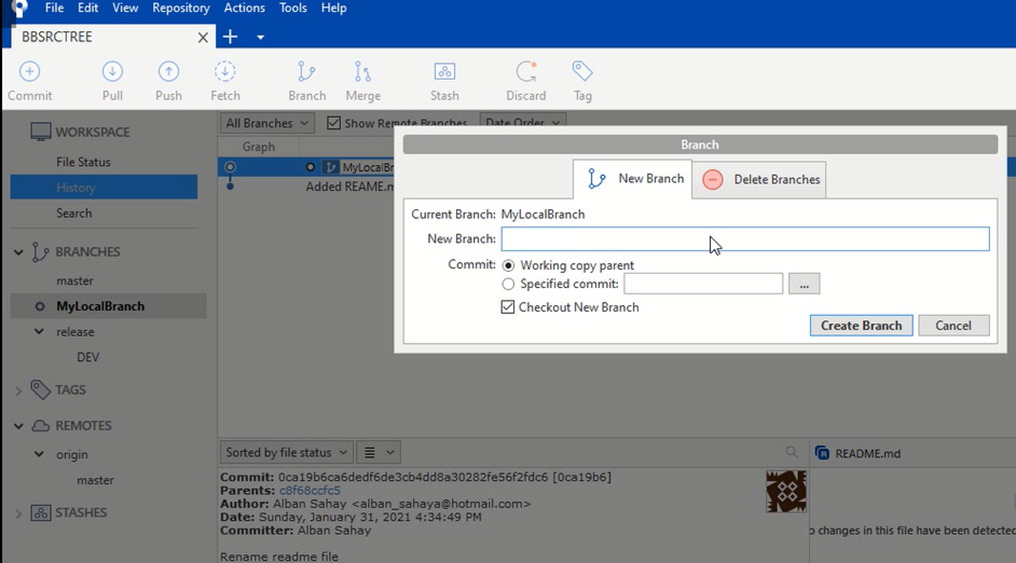
1] At sourcetree window, click on the “Branch” icon in the top. This will open a new popup window “Branch”. Enter the name of the new branch (e.g. MyLocalbranch), make sure to check the option for “Checkout New Branch” is selected and then click on “Create branch” button.
This will create and checkout the new branch. Your folder where the repository is mapped now corresponds to this new branch.
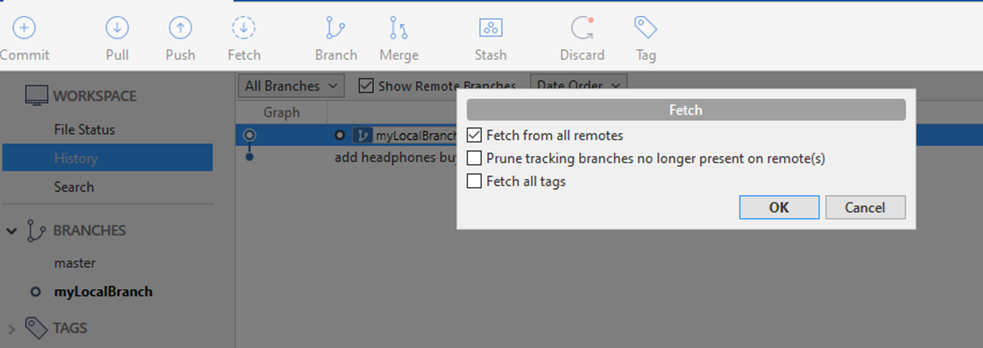
2] Click on “Fetch” button to retrieve the currently existing files from the remote branches.
3] The branches that exist at remote will now appear at sourcetree under REMOTES.
4] Start working with the copies of files at local branch by updating existing files or adding new files as required for the tasks in hand.

Bitbucket is a version control system. A version control system (VCS) is where programmers can store their code at various stages of development, so that they can restore previous versions easily when there is a requirement. Bitbucket is based on Git, which is one of the most popular VCS. Git was created by Linus Torvalds, who also created the Linux operating system.
Bitbucket can be used either as a cloud-based VCS repository or installed as an in-house application within an organization where the development teams can store their source codes. The main advantage is that it helps much with collaboration among the developers.
In this introductory tutorial, let us see how to create a repository on the Bitbucket cloud and use it for storing source files.
To start with, you need to create an account at bitbucket.org.
1] Login to bitbucket.org and click on “Get it free” to sign up for new id or login with a gmail / Microsoft / Apple ids if you do not have a previously registered login.

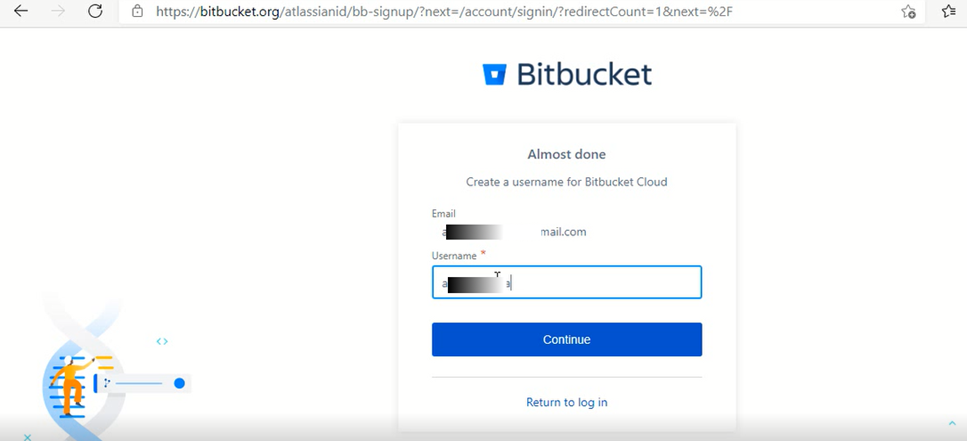
2] Specify a username for bitbucket cloud and click continue.
3] Once you login to bitbucket cloud, the welcome screen shows the option to create new repository or import existing repository. Also, there is a button to create workspace for team collaboration.

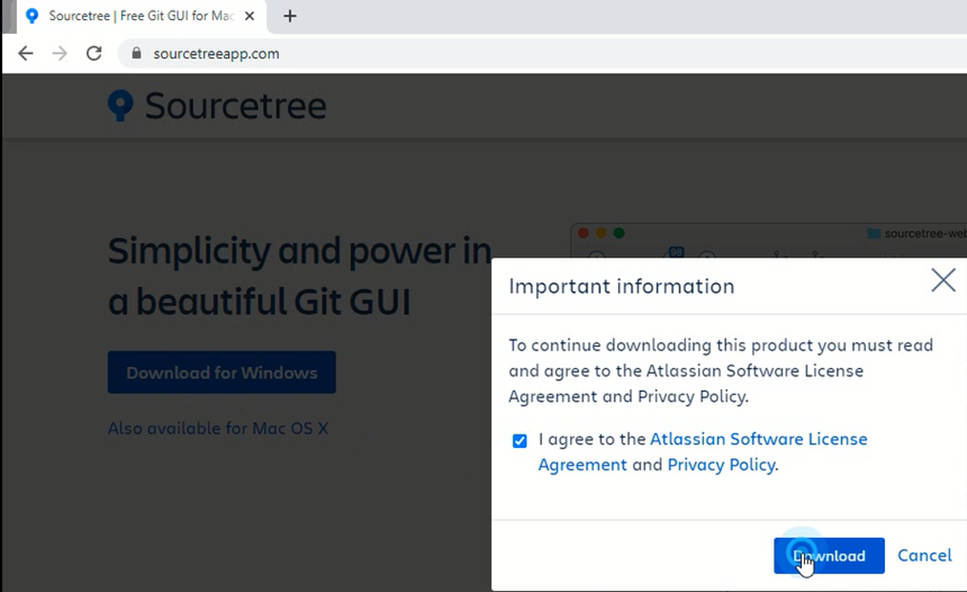
4] Sourcetree is a GUI client for Bitbucket. This is an equivalent of the Git command line client. Sourcetree can be downloaded from https://www.sourcetreeapp.com/. Click on the Download button and accept the agreement check mark followed by clicking on Download button again.
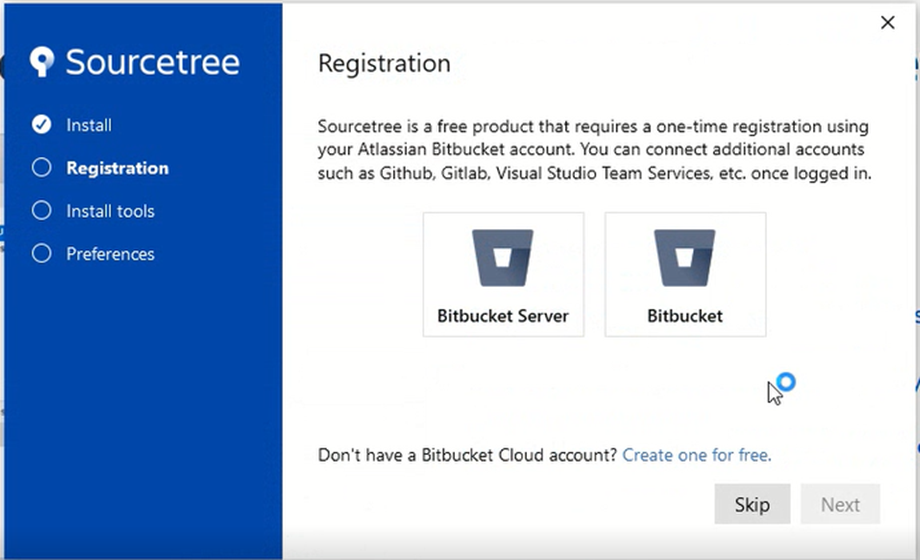
5] Double click on downloaded binary to launch the installation of Sourcetree. During the installation process, in the popup window, click on “Bitbucket” icon and click Next. The same registration id used previously with bitbucket has to be used in order to connect sourcetree client with bitbucket cloud.
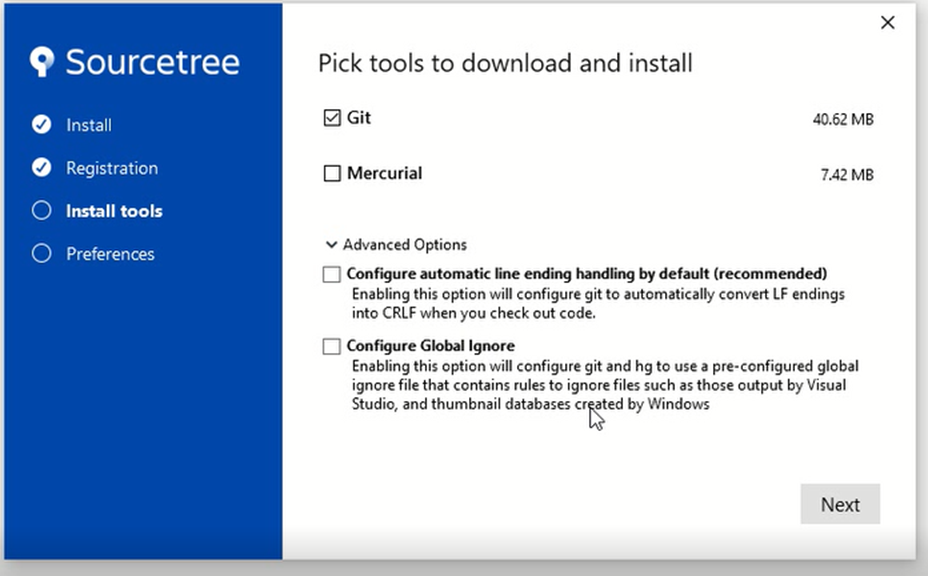
6] Once login to bitbucket is successful, a “Registration complete!” message appears. Click “Next” to continue with the installation of client tools. Select “Git” and unselect “Mercurial” and click “Next”.
7] Once the Git client installation is done, “Tool installation completed.” message appears. Click Next and in the following Preferences window, enter the bitbucket username and the email id used for bitbucket cloud registration. This will finish the installation process and open sourcetree application window.
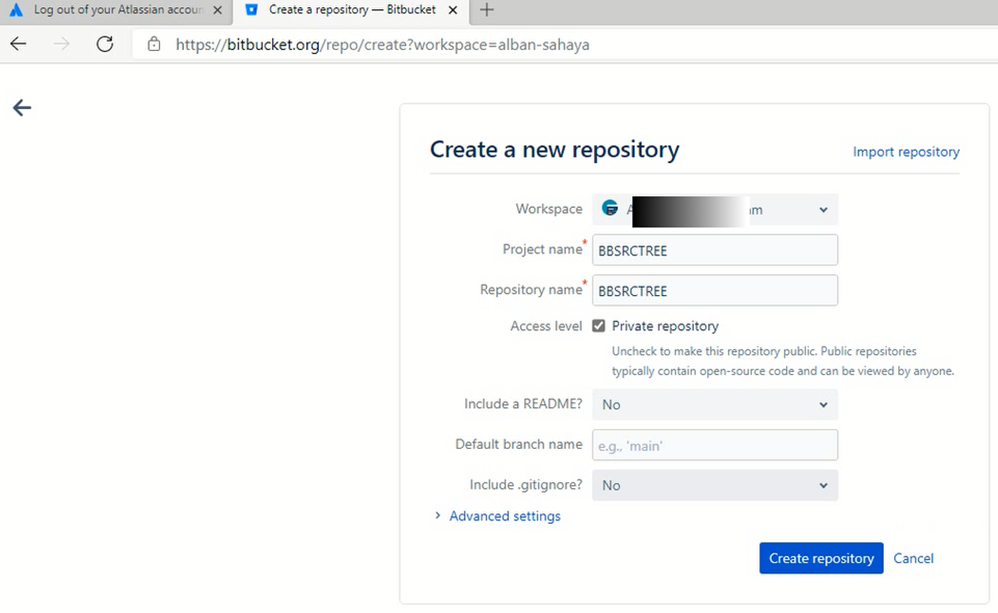
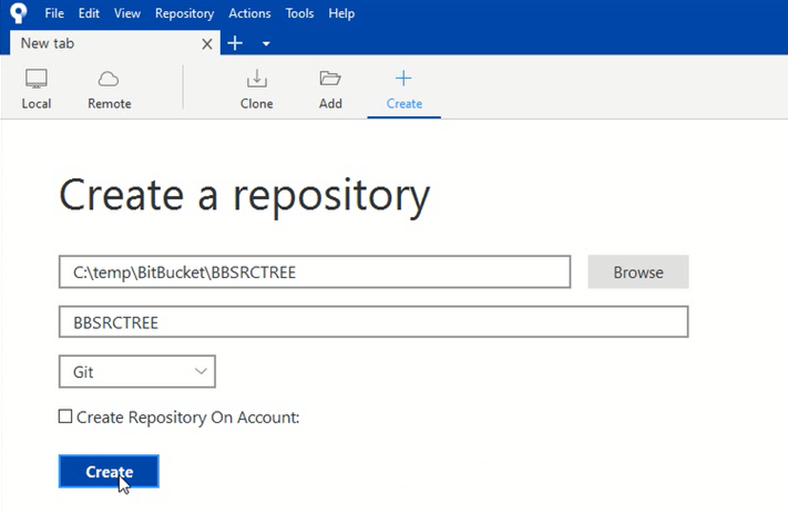
1] At Bitbucket click on “Create repository” button
In the “Create a repository – Bitbucket” window, enter the project name, repository name, check the access level as “Private repository” and other settings as indicated below and then click “create repository”
2] The new bitbucket repository is created. In the next window, it displays a command “git clone https://….git“. This command can be used to clone this repository if the Git command line client is used. We can use the URL (the value after git clone i.e., https://……git) will have to be used to specify the remote repostory’s URL at sourcetree.
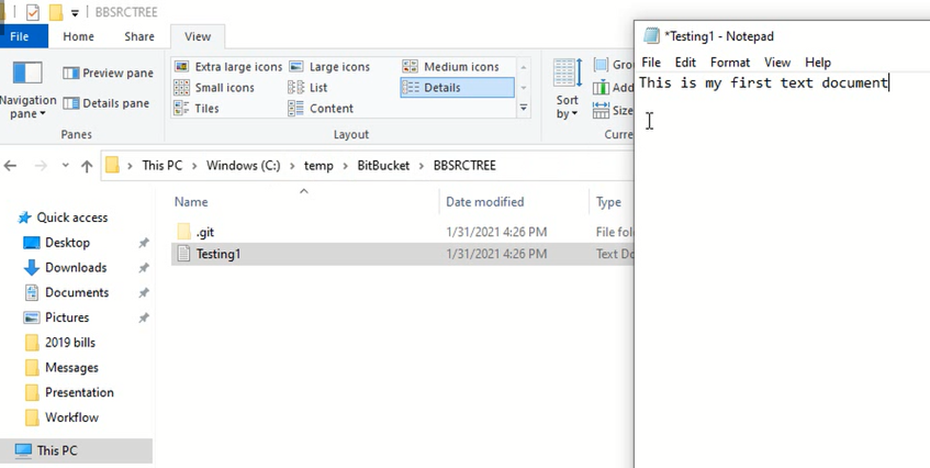
3] At Sourcetree, click on “+” icon (Create) in order to create a local repository. The folder where repository files are stored can be specified either by entering it at the specified text box or by exploring the filesystem by clicking at the “BROWSE” button. Also specify the name of the repository and the type of version control system (Git) and then click “Create” button.
4] Click “yes” if a prompt appears asking for confirmation to create the repository at the specified folder. Once the repository is created, a hidden folder called “.git” will appear at the repository folder. The .git folder contains configuration settings associated with the Git client. Don’t touch this hidden directory for now.
5] Create a new text file called Testing1.txt at the local folder designated for the repository and add some content to it. Then save it.
6] As soon as the new file is added, the sourcetree shows it as “Uncommitted changes” and the filename appears under “Unstaged files”. select the filename and click on “Stage selected”. The filename now appears under “Staged files”.

7] Click the “commit” icon in the top. Specify few comments such as “First commit” in the text box at the bottom of the window and click on the “Commit” button below. This might prompt to confirm the full name and email id. Click ok after verifying the values.

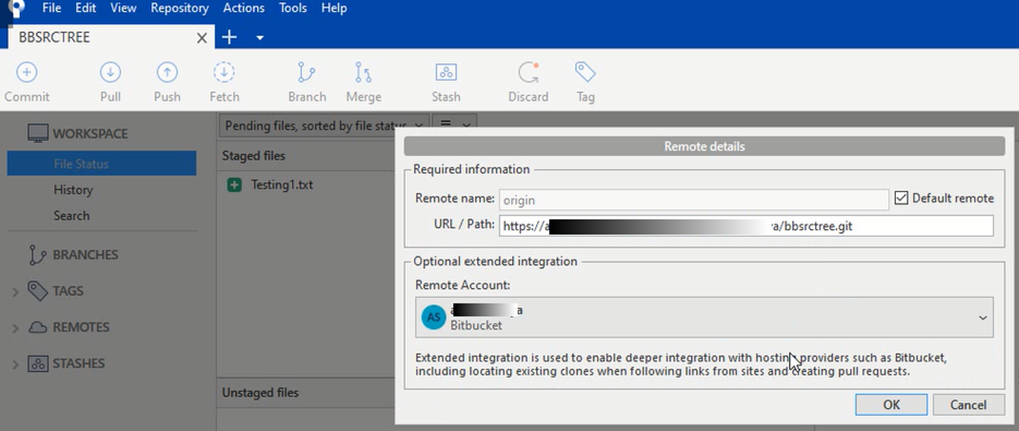
8] From the top menu, select “Repository -> Repository Settings”. This will open the “repository settings” popup window.
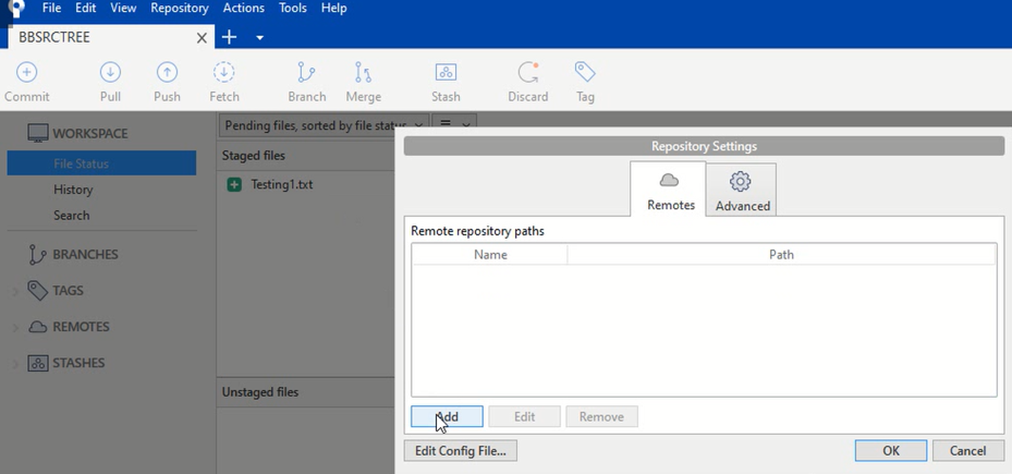
9] Click “Add” button and then specify the URL (as specified in step 2 above) and remote name as well as the bitbucket account name and click OK. Again, click OK at the next prompt.
10] At the local folder associated with the repository, add another file called “README.md”, add few introductory contents to it and then save it. At the sourcetree, stage the new file and click on “Commit” icon. Add a comment about reason for this commit and then click on “Commit” button.
11] At sourcetree, click on “Push” button. This will open a new popup window. Check the box which indicates local branch as “master” and specify remote as “master” and then click “Push”. At the CredentialHelperSelector window, select “manager-core” and check the box “Always use this from now on”. The files get pushed to remote now.
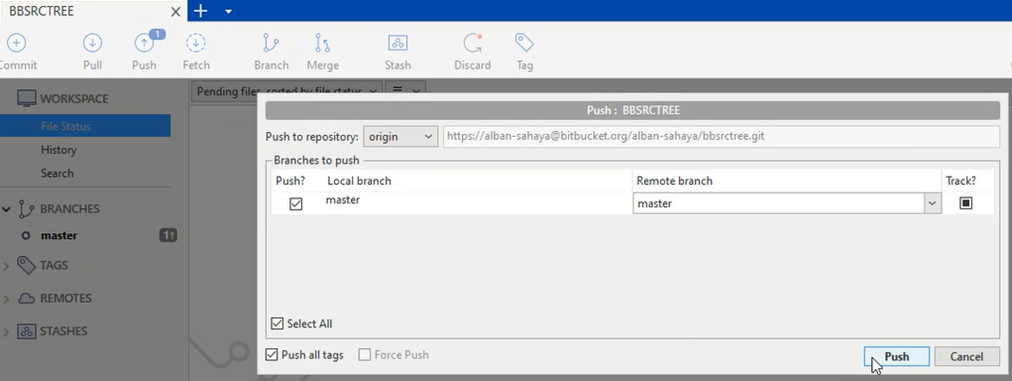
12] Refresh Bitbucket and open source and verify if the files are listed under master branch.


Small businesses often might need to purchase things or services from vendors such as online stores, regular retailers or other small businesses. Whenever a purchase happens, it needs to be recorded in the books. So, let us see how to do this using GnuCash.
Let us add a vendor and then the purchase bill. Adding vendors is similar to adding customers that was explained in the earlier post.
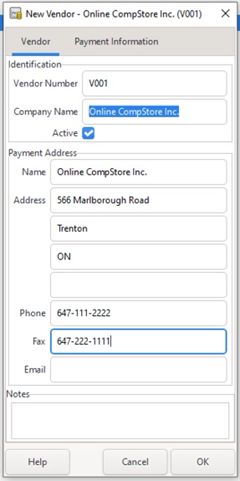
1] From the top menu, click on Business -> Vendor -> New Vendor…
2] At the New Vendor popup window, enter the details of the vendor “Online CompStore Inc.” and click OK. Make sure the default currency for this vendor is according to the location of the business.
3] Create an account “Info Tech Purchase Payables” under top level account “Liabilities” and type A/Payable. Also create another expense account “InfoTech Purchase Expense” under Expenses top-level account.
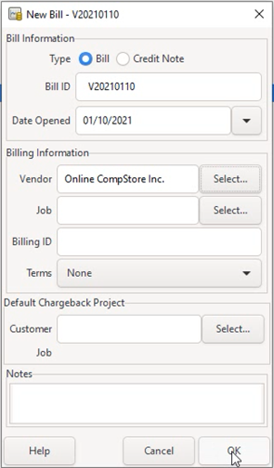
4] To add the new bill, select from the top menu, Business -> Vendor -> New Bill…
5] Enter the Bill ID, Date Opened as shown below. Also find and select the vendor “Online CompStore Inc.” which was added in step 2. This task is similar to finding and selecting the customer during the creation of new invoice. Then click OK button.
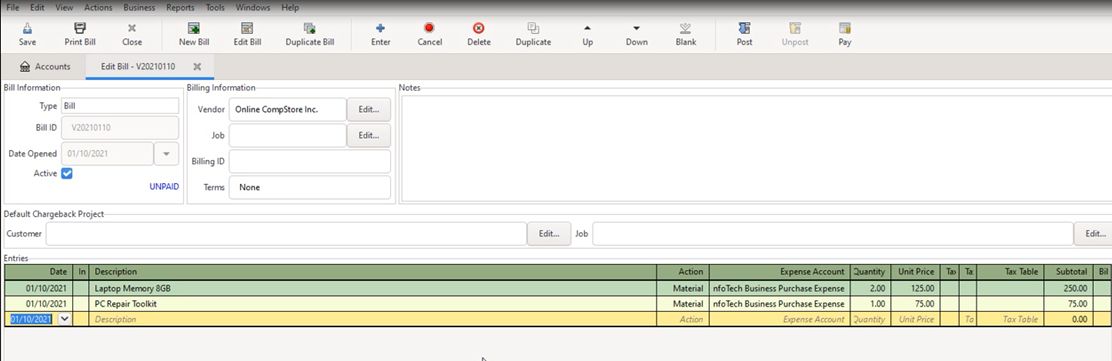
6] At the “Edit Bill – ….” Tab, enter the date, details of the items purchased, Action as “Material”, expense account as “Expenses:InfoTech Business Purchase Expense”, quantity and unit price as indicated in the screenshot below. At the last line click “Enter” key and then click “Save”.
7] Click “Print Bill” icon to view the bill as it exists now. Please note that we didn’t specify tax in the bill because we took the unit price including tax. So the final total will be cost including tax. (This should be okay for small businesses assuming the sales tax given while purchasing is comparatively less than the sales tax collected due to services rendered and materials sold to vendors. In such case the sales tax to be returned will be calculated as a fraction of total income earned in many countries. However, similar to how it is done for sales, it is also possible to track cumulative sales tax given during purchases with separate sales tax given account, so that at the year end, it can be subtracted from sales tax collected and then pay the remaining to tax authorities.)
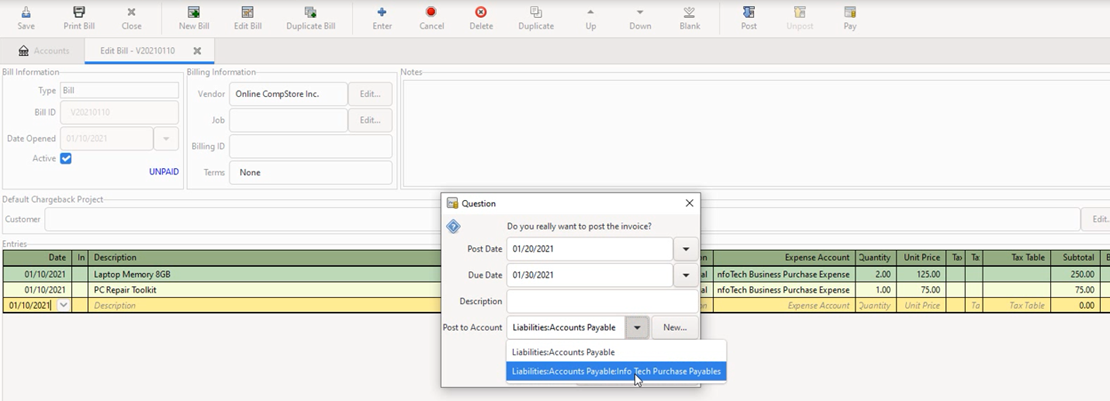
8] The bill need to be posted before payment information can be entered. Click on “Post” icon. A popup window appears asking “Do you really need to post the invoice?”. Enter the values as in the following screenshot with the post date, due date and the Post to Account (Liabilities:Accounts Payable:Info Tech Purchase Payables”). Click on “Save” icon.
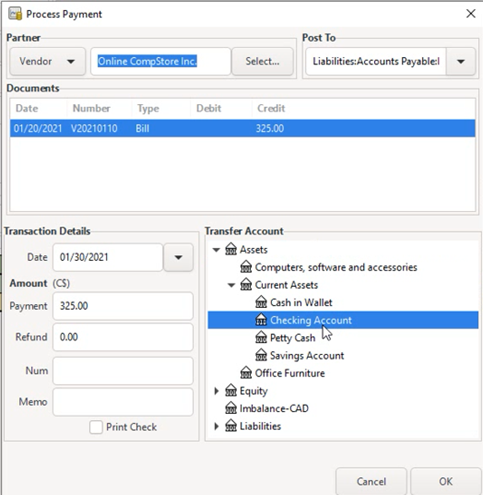
9] In order to record the payment details of the bill, click on “Pay” icon. This can also be done through the top menu “Business -> vendor -> process payment” and then selecting the vendor as well as the bill number. At the “Process Payment” window, enter the transaction date, amount paid as well as the account from which money is transferred. Then click OK. The status of the bill changes from UNPAID to PAID. Click “Save” icon to save it.
10] Click on “Print Bill” icon in order to see the printable view of the bill. This can be printed if necessary or saved as a PDF file also for printing later .

Any business needs customers for its continued existence. Major part of the business income is generated from sales to customers. Usually when selling something, an invoice is created in order to document the details of the sale. In this post, let us look at how to add information about customers and sales invoices as well as processing related sales transactions in GnuCash.
To start with, collect details about the customer, such as the name, address, phone, etc. If you have already agreed with the customer about the billing terms, it can be entered within the Billing Terms dialog box. The billing terms includes details such as within how many days after the invoice was created and service rendered, the payment has to be posted; if there is any discount allowed when payment is made within specified days, etc. The amount of sales tax which needs to be collected while making the sales transaction can also be updated through tax table.
In this example scenario, we are going to create a new fictitious customer called “Mountainside Company Inc”. Our fictitious company “I.T. Softpro Consulting Inc” does software consulting work for this customer on an hourly basis and we are going to see how to create the invoice and process it.
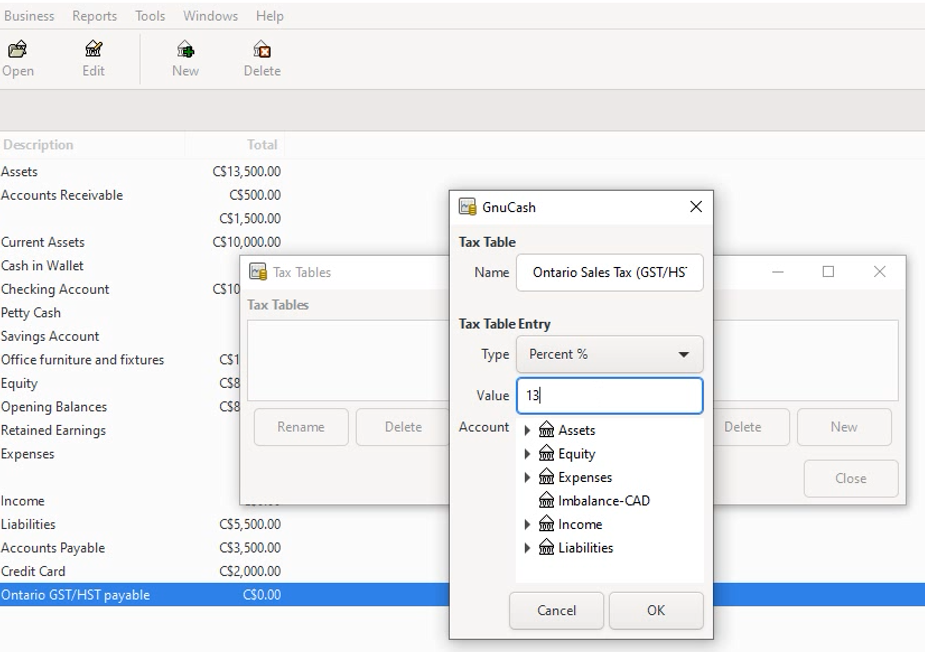
1] Create a new liability account for keeping track of Sales tax. This is done by right clicking on the “Liabilities” top-level account and selecting “New Account” from the popup menu. Enter the name (for example, “Ontario GST/HST payable” for the business which operates from Ontario, Canada) and description as in the following screenshot :

2] Create the tax table by selecting Business -> Sales Tax Table from the top menu and then clicking on “New” button at the Tax Tables popup window. A new popup window appears. At the new GnuCash Tax Table window, enter the name of the tax table (for example, “Ontario Sales Tax (GST/HST)”) and then the type (usually percentage%) and value (for example 13 for Ontario – Canada). Also select “Liability” for Account Type and the Sales Tax Account that was created in step 1 above (“Ontario GST/HST payable) for Parent Account. Then click OK button. Again click OK at the Tax Tables window to close it.
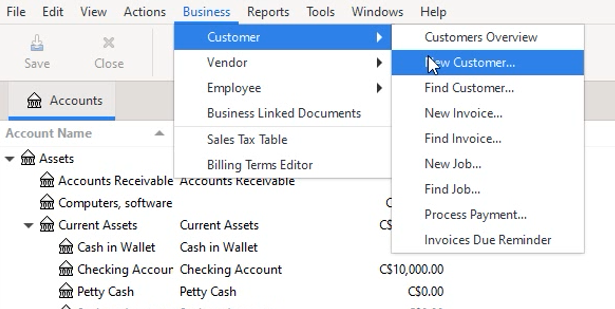
3] To add the customer, from the top menu select Business -> Customer -> New Customer
4] The “New Customer” popup window opens. Enter the details of the customer such as name, billing address, phone, email, etc. The following screenshot shows a sample for the fictitious company discussed earlier. Under Billing Information, select the currency as required based on the location. (In case the tax table is selected as None, there is still provision to select it under invoices). Under Shipping Address tab, enter the address the customer requires items shipped. It is mostly same as billing address. Click OK button after entering customer details.

5] Create a new Invoice for this customer:
a] From the top menu, click on Business -> Customer -> New Invoice, which shows the New Invoice popup window.

b] Under “Billing Information” section, click on “Select” button for selecting customer. At the “Find Customer” popup window, enter “M” at the text box and click on “Find” button which displays the line containing customer “C001 Mountainside Company..”. Click on “Select” button.

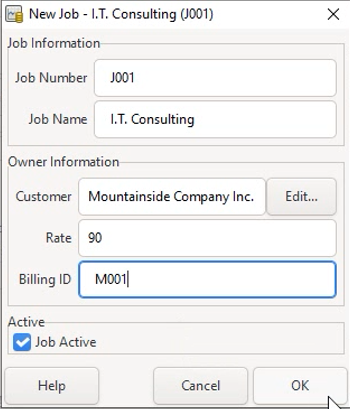
c] Control is again taken back to “Invoice Information” window. Click on “Job” button to select the type of job done for which the invoice is to be charged. The “Find Job” popup window appears. As there were no jobs defined yet, click on “New Job” button at the bottom of “Find Job” window. Enter the Job details. In this the rate indicates the hourly rate in the default currency associated with the customer “Mountainside Company Inc.”. Click OK once the details are entered.
d] The “New Invoice” popup window now has all the required information for opening new invoice entries. Click OK.

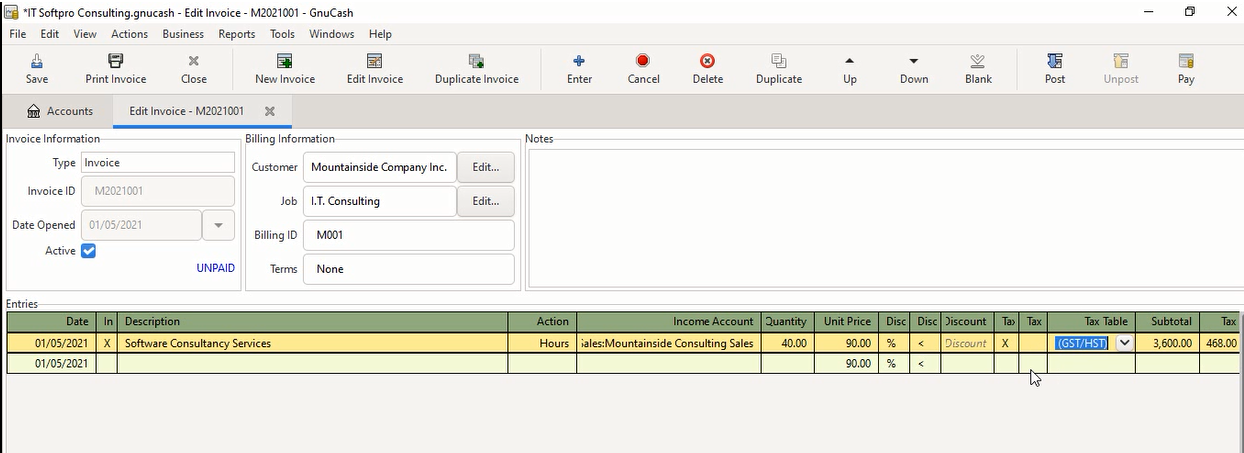
6] The “Edit Invoice – …” tab opens at the main window. The Invoice information as well as Billing information are filled in already.
a]At the Entries section, enter the values of Date with the date when the work was done and Description. Click on the Action field and select “Hours” because we will calculate the amount based on the number of hours worked. At the field “Income Account” type “Income:Sales:Mountainside Company” and press Enter. This will prompt whether to create a new income account. Click Yes and it opens the window for creating new account. Enter the values as in the screenshot and click OK.

b] Select the “Edit Invoice – ….” tab. Enter the value for field “Quantity” as 40 to indicate 40 hours worked. Click the check box “Tax Table ?” to indicate sales tax will be charged. Click on “Tax Table” field and select the “Ontario sales tax (GST/HST)” which was entered previously in step 2. Press Enter which will update the Subtotal and Tax fields automatically. Then click “Save” button to save the details.
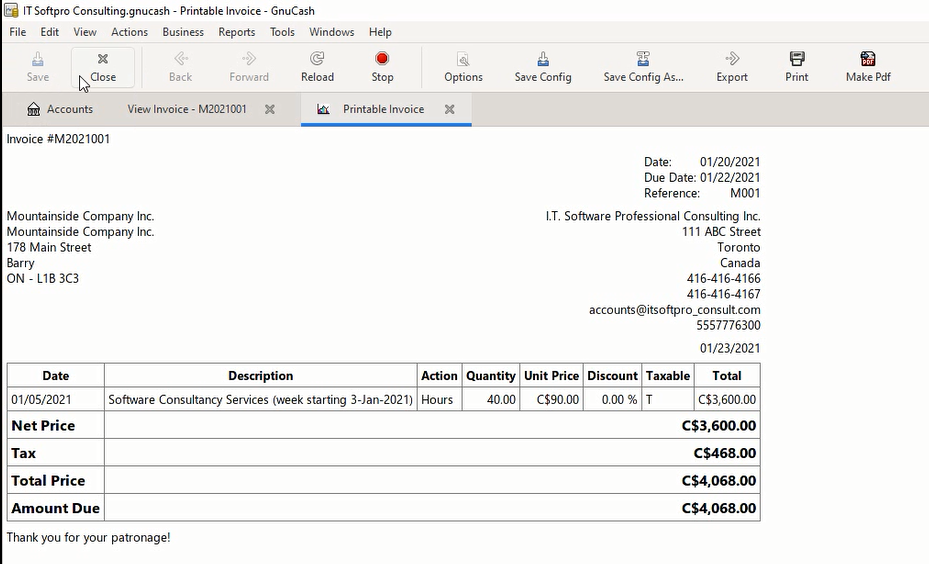
7] a]Click on “Post” button to post the invoice. A popup window appears asking “Do you really want to post the invoice?”. Update the post date and the due date. Usually the due date might be 30 days from the post date. However it depends upon the customer agreement. Click OK.

b] Click on “Save” button and then “Print Invoice” button. This shows the invoice in print format.
8] At the accounts tree main window, the Sales tax (GST/HST) account indicates the amount of tax charged for the previous transaction through invoice. Also the Income account of Mountainside indicates the income processed through invoice.
Let’s assume that the customer has paid for the invoice. In order to record this, we have to process the payment.
a] Select Business -> Customer -> Process Payment… This opens the Process Payment popup window.

b] Update the date in which the payment was processed and also select the account to which money is transferred (usually the Checking account). Then click OK.
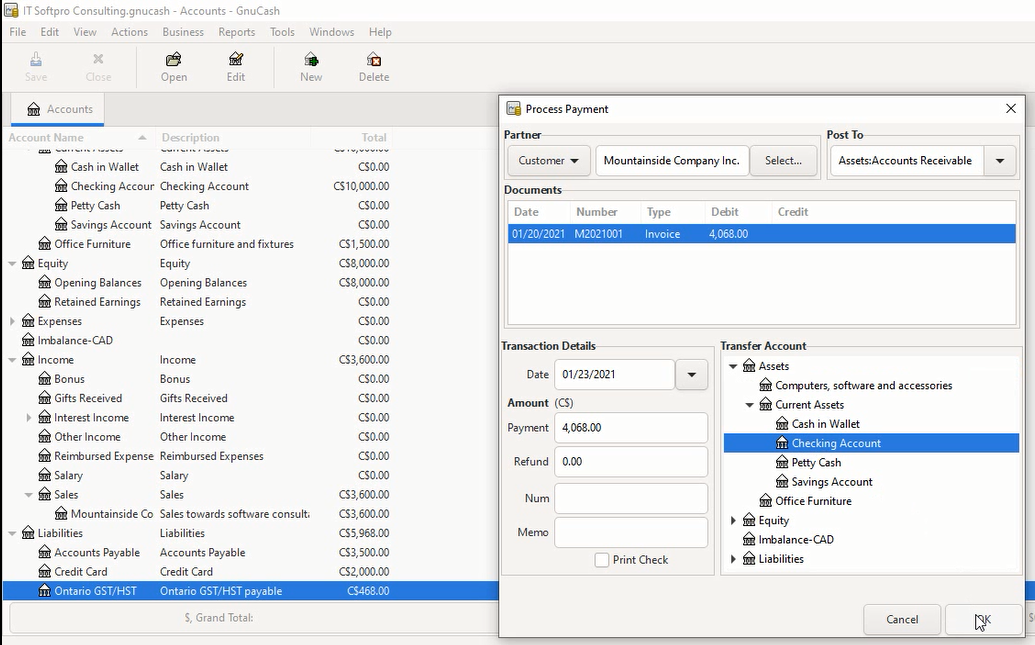
The will change the status of invoice from “UNPAID” to “PAID”.
Save the invoice by clicking on “Save” button and then click on “Print Invoice” button. This will display the invoice in printable format indicating payment information.

Multiple transactions put together as a single transaction will appear as “–Split Transaction–” under the Transfer field.
To see an example of a split transaction, from the top-level menu, select Income -> Sales -> Mountainside Consulting Sales. Select the line which contains the text “–Split Transaction–” and click on “Split” button. This will show the individual transaction which form the combined invoice transactions.
![]()
Click on “Split” icon again to go back to single line view of the transaction.
Nowadays many of the accounting / bookkeeping software are available in both desktop and public cloud versions. In fact, many of them do not provide an option for desktop version. It is a matter of convenience and personal preference as to which version is considered better before being chosen by each person. The cloud providers usually charge a monthly fee or annual fee. In my case, I do not want to send my personal data to a third party cloud provider and keep on paying monthly subscription. But above all, there is a danger of our accounts being compromised through hackers with the cloud. I strongly believe, the hackers wouldn’t spend time hacking into my personal desktop just to uncover some of my private data regarding my few hundred dollars. 🙂 But above all, a cloud provider has the option of freezing my accounts or kicking me out tomorrow, if, for example, few of my enemies bring forth a false allegation against me and forcing the cloud provider with few real or assumed consequences. 🙂 You might be inclined to think that this would be a very rare scenario. However, think twice. Similar situations have happened before, happening now and definitely will happen in the future. In any case, anyone could understand that the level of potential control the cloud providers have on their subscribers far exceeds that of the desktop software vendors on their customers. So, I always prefer desktop based bookkeeping and accounting software.
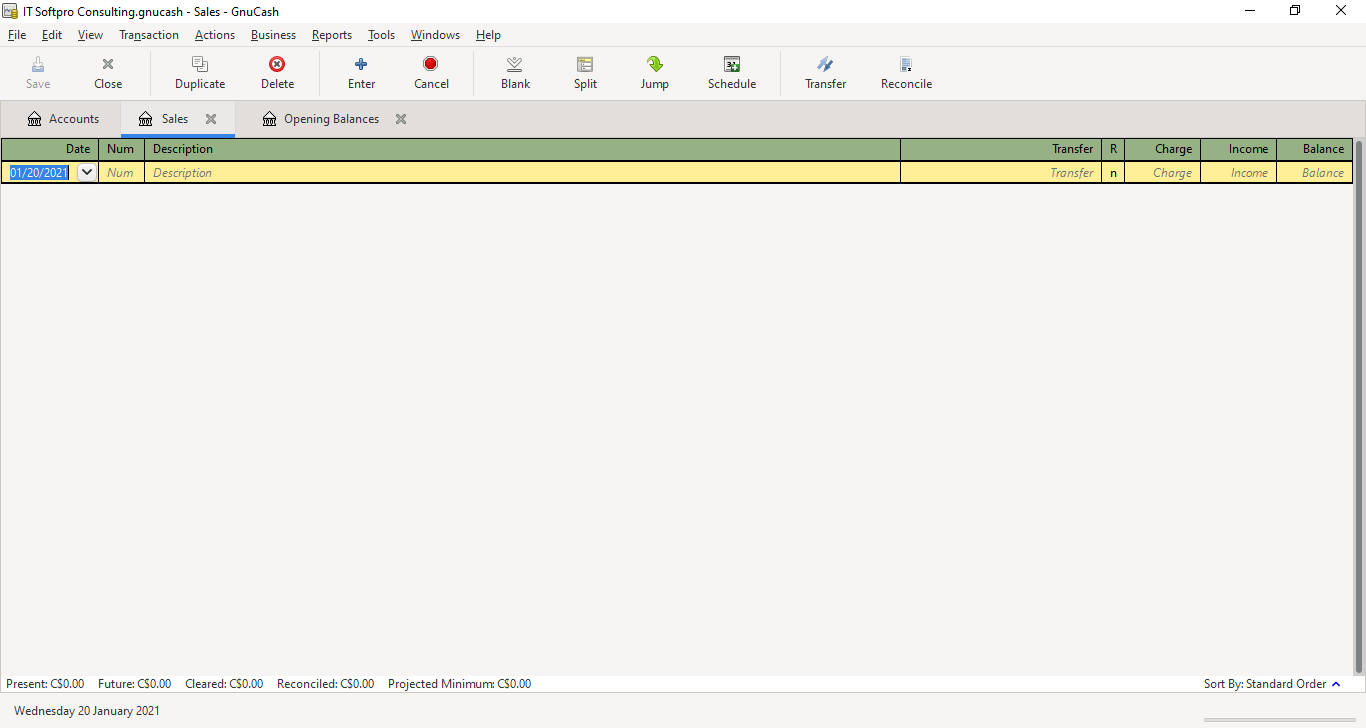
Every activity of a business is done through transactions. Recording transactions on GnuCash is quite easier once the chart of accounts is setup. A transaction involves transferring money between two accounts within the chart of accounts. For most of the small businesses, transfer very often involves the bank accounts such as checking account and credit card account.
When an account is opened, the account register associated with that account opens. It is usually convenient to enter the transactions through account register. The following picture shows a sample blank account register associated with the sales account.

Values need to be entered as per the following list for each sales transaction record for the above sales account. Some of the fields are optional.
Date – date when the transaction took place or recorded
Num – It could be a sequence number for reference, a check number, etc.
Description – A descriptive line of text to give some information about what was transferred
Transfer – As the transfer is from the account associated with the currently opened account register (sales account in the above screenshot) and another account, this field should have the name of the other account involved. It can be selected from the list of accounts which shows up when clicking at the down arrow button.
R – indicates reconciliation status. The default value is ‘n’.
Charge (debit) – enter an amount to indicate if there is any charge or fee to be paid while doing the sales
Income (credit) – enter the amount received as a result of the sale
Balance – will be calculated automatically and displayed
Any accounting book will require a financial year start and end so that the appropriate reports can be filed with the government’s tax authorities. When a business starts from scratch, it may have all opening balances with 0 (zero) balances at the start of the financial year. But even with a fresh business, there might be an initial investment amount which might be deposited to the checking account and could be considered as opening balance. However, when you transfer from one system of accounting to another system, there are multiple accounts which will have balance amounts which need to be entered into the accounting system during the start of the financial year. These are the opening balances. GnuCash has provision for entering the opening balances of various accounts during the time of the creation of chart of accounts. It also has an account called “Opening Balances” under the Equity top level account, which can be utilized for entering the starting balances.
We have previously created a new file containing chart of accounts for a tentative business with default currency as Canadian Dollar (CAD). Let us enter the opening balances of the following from blank startup values on this account tree:
| Account Name | Opening Balance |
| Balance brought forward from previous year (checking account) | CAD 10000 |
| Credit Card Amount Payable | CAD 2000 |
| Office Furniture | CAD 1500 |
| Computer accessories & software | CAD 1500 |
| GST/HST Payables | CAD 3500 |
| Accounts receivable from customer | CAD 500 |

3. Click on the “Accounts” tab to see the status of the Accounts tree. The values of “Checking Account” and “current Assets” show $10000 now.
![]()
4. Open the Accounts register of Opening balances again and a the next blank line, enter the values for credit card balance payable. Select “Liabilities:Credit card” for the field Transfer from the list of accounts and enter the value of (CAD) 2000 under the field Decrease (Debit). This updates the Balance field (CAD) 8000.
![]()
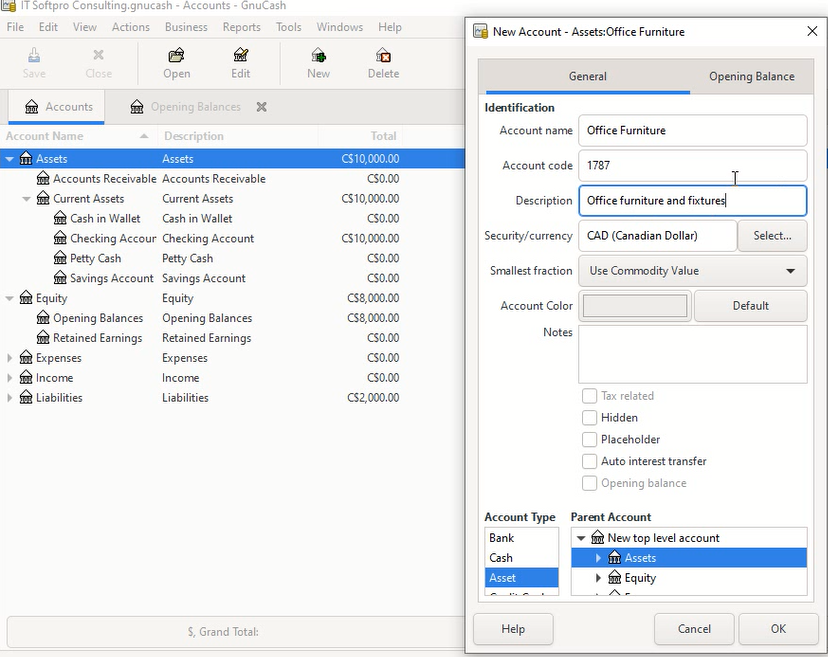
5. In order to enter the starting balance value of office furniture, we need to have an acount for this purpose under the top-level account “Assets”. Click on the Assets row and click the “New” icon on the top menu. This opens up a new dialog box for the details of the new account. Enter the values of Account name, Description and make sure the currency is selected as CAD. Under Account number enter the GIFI code 1787 associated with Office furniture. This (GIFI) is a Canadian standard account code. However, the account numbers can be updated according to the standards being followed at any specific country or based on a predefined account numbering system for the accounting tree. In the bottom of the dialog box, make sure the Account Type is selected as “Asset” and parent account is “Assets”.
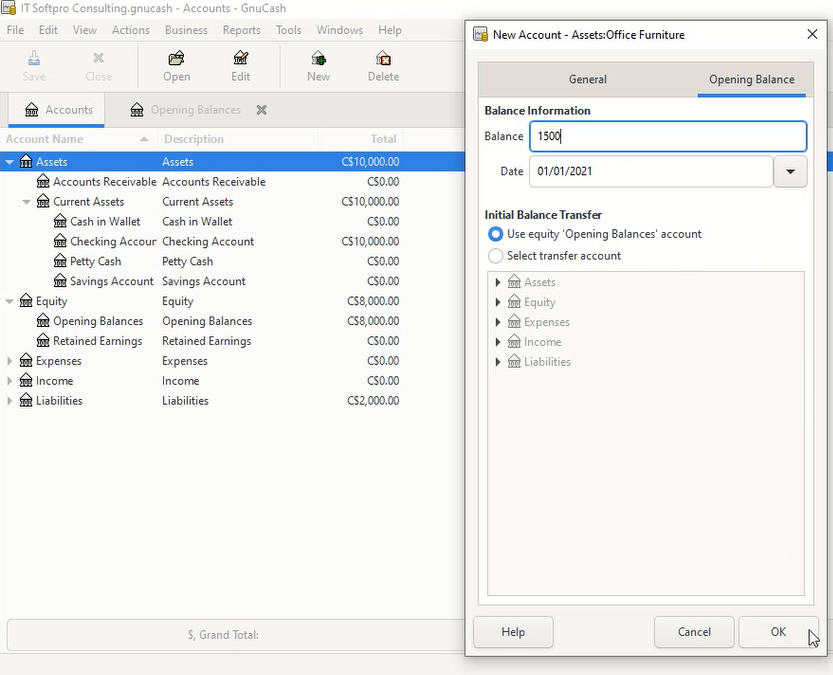
6. Click on “Opening Balance” tab and enter the values of Balance amount, date and then click OK button.
7. Now, view the account register associated with “Opening Balances” and notice the last row which indicate the new entry that has been added related to the new Office furniture account.

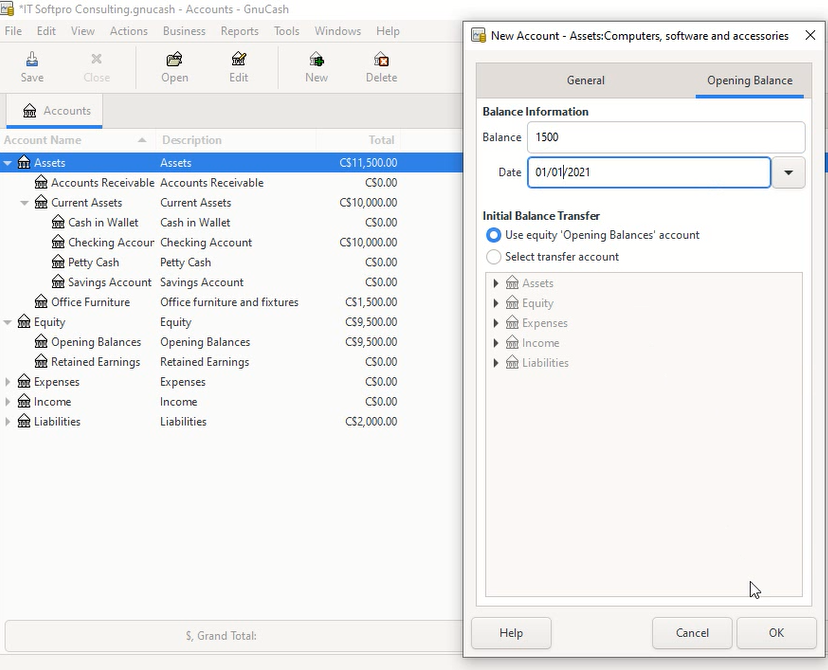
8. In order to enter opening balance for “Computers, software and accessories”, at the main Accounts tab, keep the Assets row selected and click on New icon. Enter the values as indicated in the screenshot below.

9. Click on the “Opening Balance” tab and enter the values as indicated in the following screenshot.
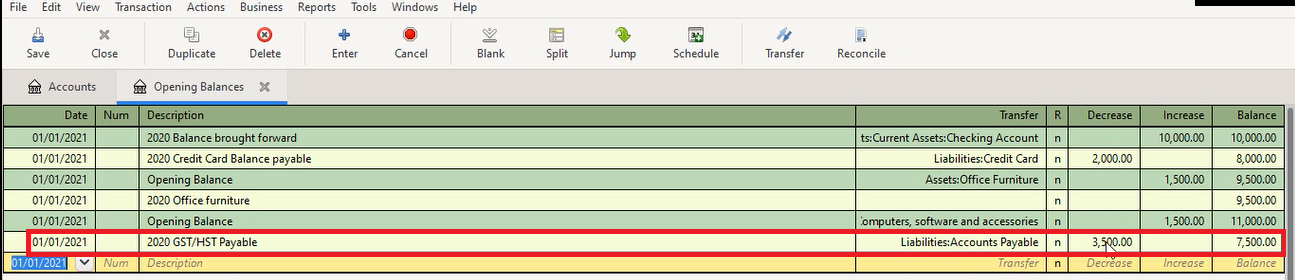
10. click on the Account register of Opening Balances tab, and select the last blank row. Enter the values for the fields as indicated in the highlighted (red box) line below for “GST/HST Payables”.
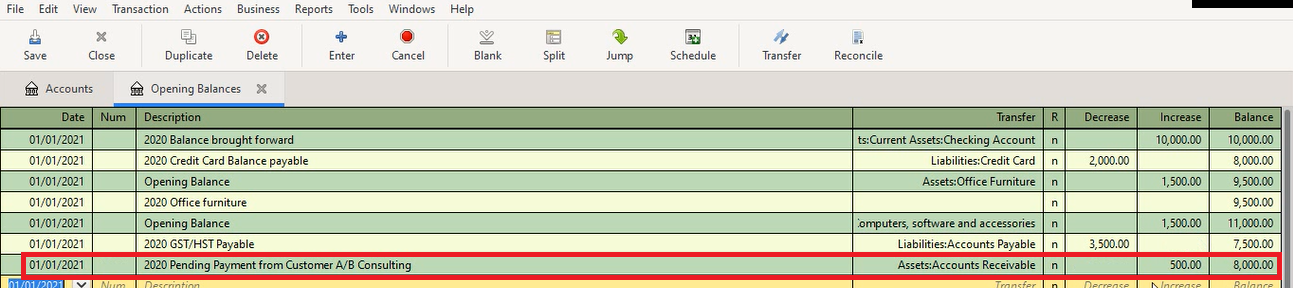
11. At the next blank row, enter the values as indicated in the highlighted (red box) section of screenshot below in order to update the details of accounts receivable from customer.
12. Click on the Accounts tab to see the final values updated to each account as a result of the transactions entered so far.


The accounting equation says that the difference between total assets of a business and its total liabilities equals its net worth (equity).
Assets – Liabilities = Equity
This can further be expanded when we consider the income and expense. The equity (net worth) increases when receiving an income and decreases when money is spent for something (expense).
Assets – Liabilities = Equity + Income – Expenses
The above equation has five accounting entities (accounts):
| Assets | Things that are owned. For example, money in the bank, car, building, etc. that the business owns |
| Liabilities | Obligations owed to other businesses and people are considered liabilities |
| Equity | Overall net wealth, the shareholders of a business can claim at any point in time after paying off debts |
| Income | Money earned through sales, interest from bank deposits, etc. |
| Expense | Money spent on rent, utilities, repair of vehicles, insurance, etc. |
As GnuCash can be used for personal as well as small business accounting, we need to decide which accounts to be created initially. As time goes by, new accounts can be added, existing accounts modified or deleted based on requirements.
The accounts being used for a business have to be arranged in a hierarchical, tree structure called a chart of accounts. GnuCash provides much flexibility in the organization of the accounts within the chart of accounts. The chart of accounts can be created from a predefined set of accounts using the “New Account Hierarchy Setup” wizard or manually by creating each of the required top-level accounts and the subaccounts.
Note:
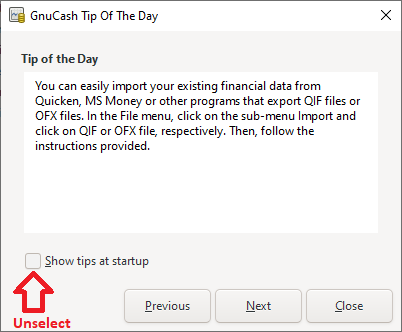
When the GnuCash program starts, a popup window will appear, showing Tip of the day. It can be disabled by unchecking the “Show Tips at Startup” checkbox and then the Close button.
1) Open GnuCash Application
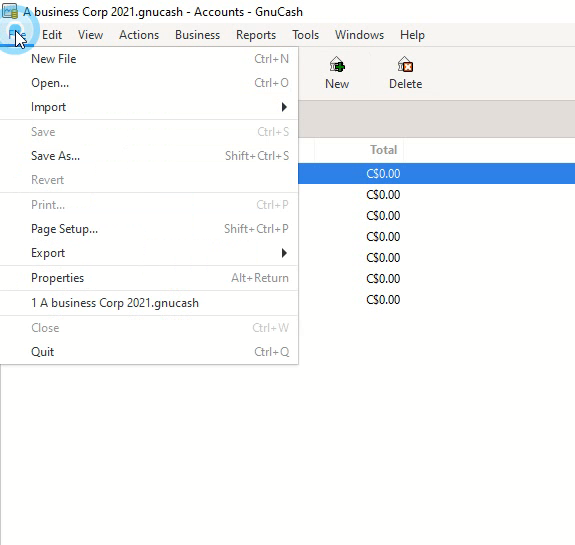
2) From the top menu select File -> New File which will open the wizard
3) Click Next at the account setup wizard
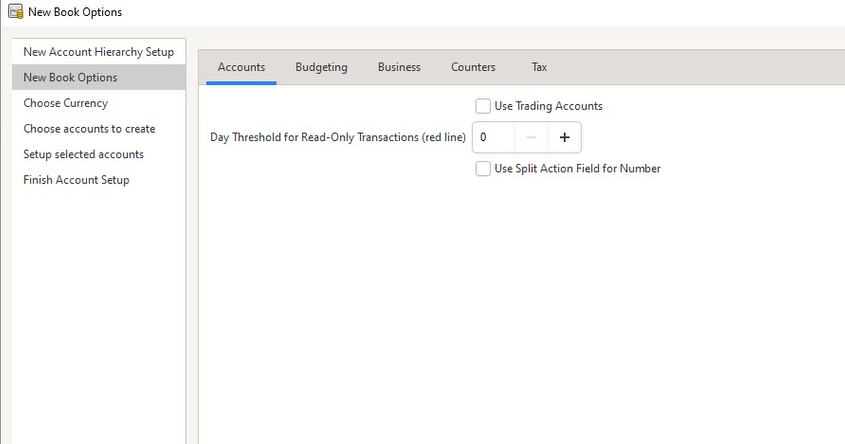
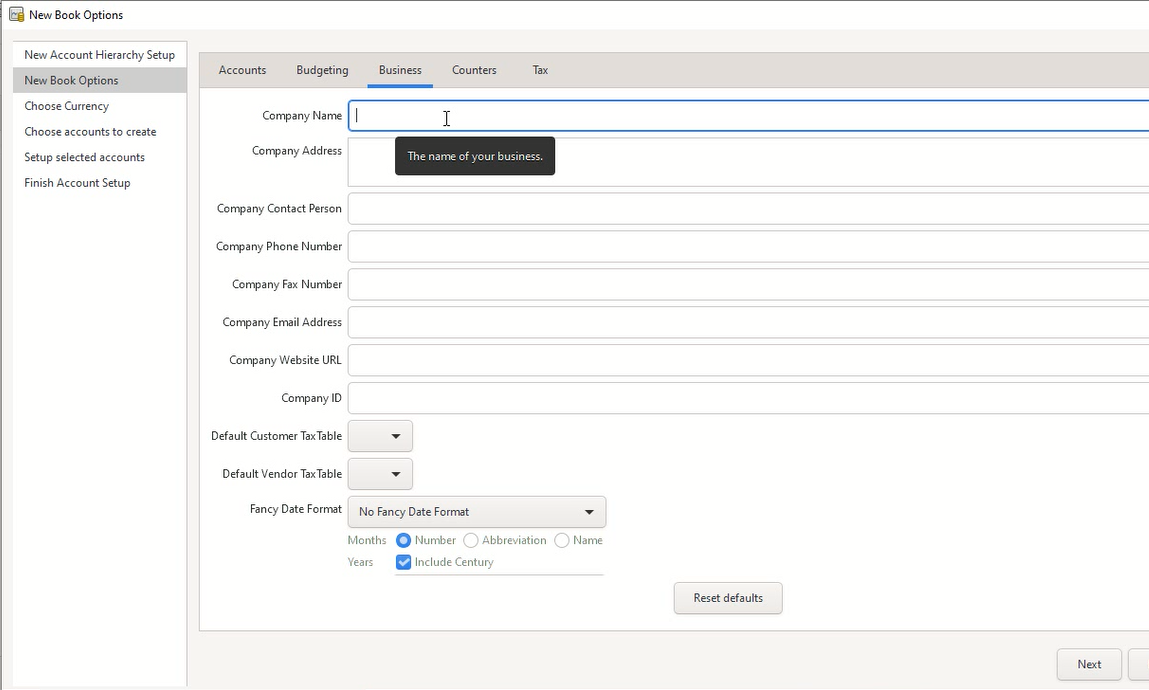
4) Enter the business details such as Company Name, Company Address, contact, Company ID (Business Tax Number), etc. and click next
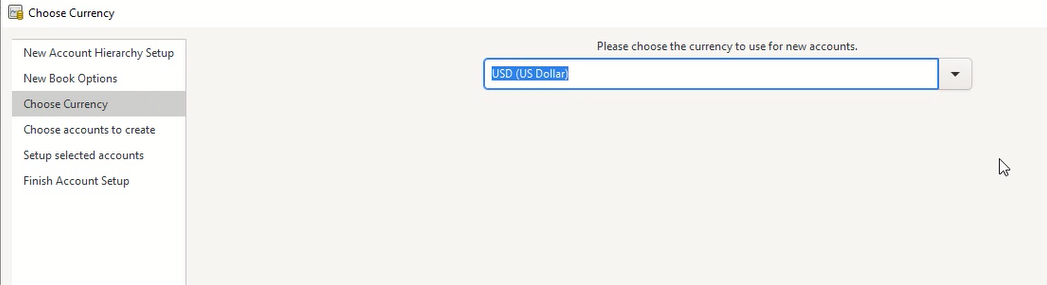
5) Select the default currency for the business depending upon the country where it is located and click Next.
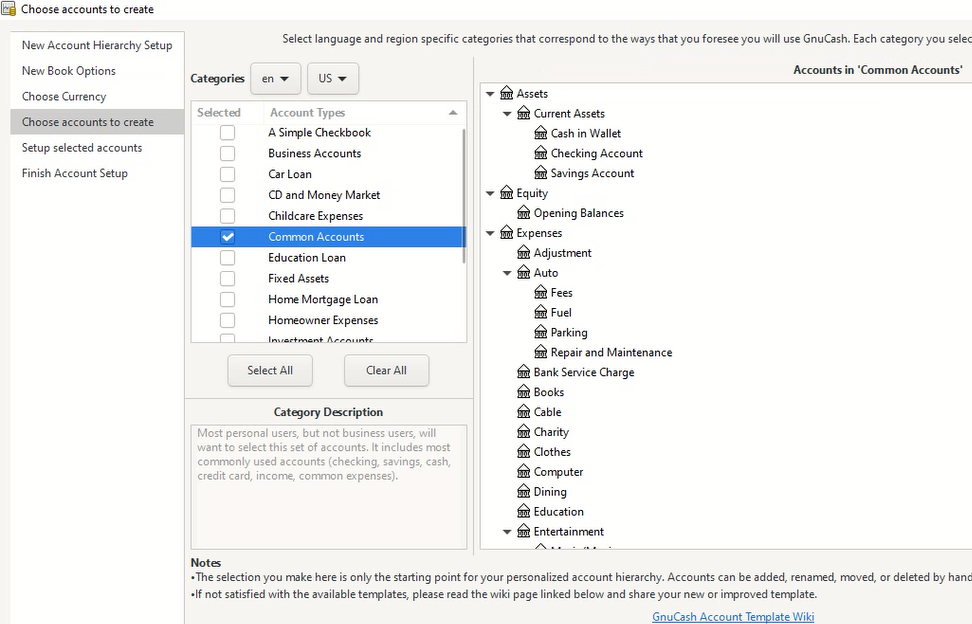
6) Select the language and region-specific categories as relevant to the business. Also select the account types. For example, “Common Account” and “Business Accounts” have been selected in this case as we are planning to create the chart of accounts for a small business. Additional accounts can be added / deleted and also existing accounts modified later if needed. Click next.
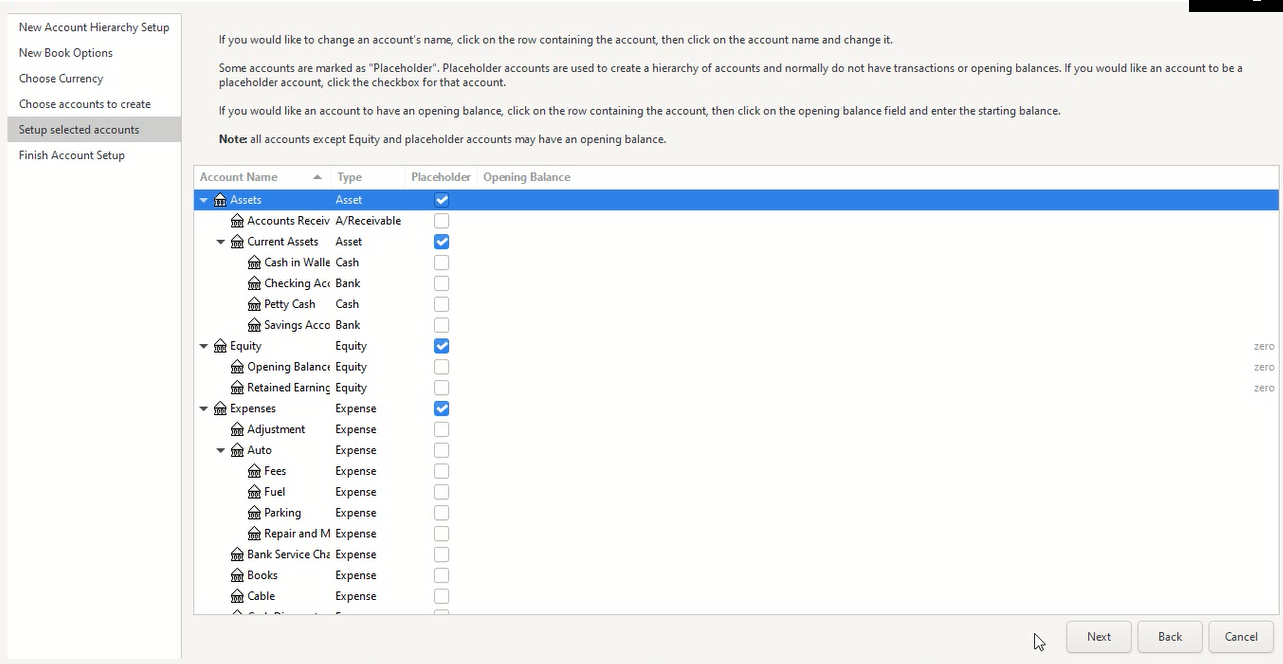
7) The next dialog box displays the accounts created. If the name of any account needs to be changed, it can be done by clicking on the row containing the account and clicking on the account name and changing it. The accounts marked as “Placeholder” do not usually have opening balances or transactions. The placeholder accounts are meant for creating the account hierarchy. All accounts other than Equity and placeholder accounts can have opening balance. The opening balance can be entered by clicking on the specific row of the account and entering the value at the corresponding field. Once the accounts have been updated, click Next.
8) Click Apply at the Finish Account Setup” dialog box.

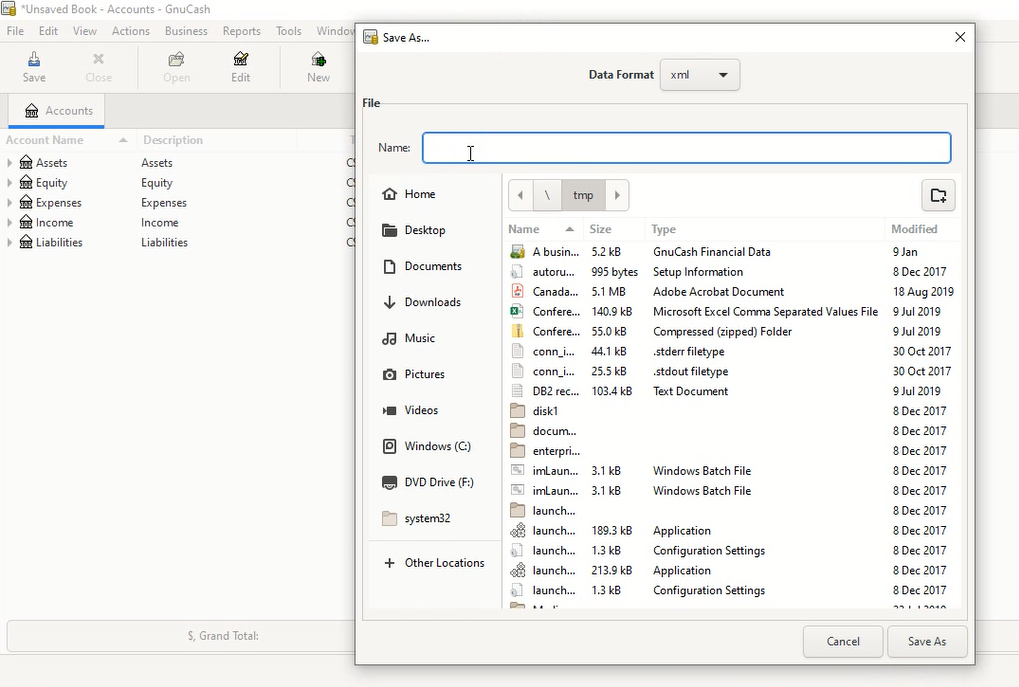
9) The top-level accounts are listed and a dialog box pops up asking for the name of the file which will contain the new chart of accounts. Select the correct folder, enter the file name and then click “Save As”.
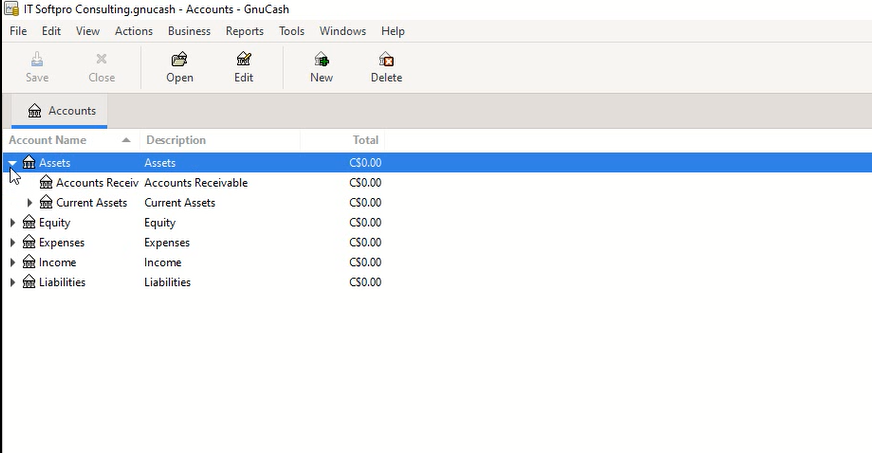
10) The file is saved and the accounts tree is displayed.
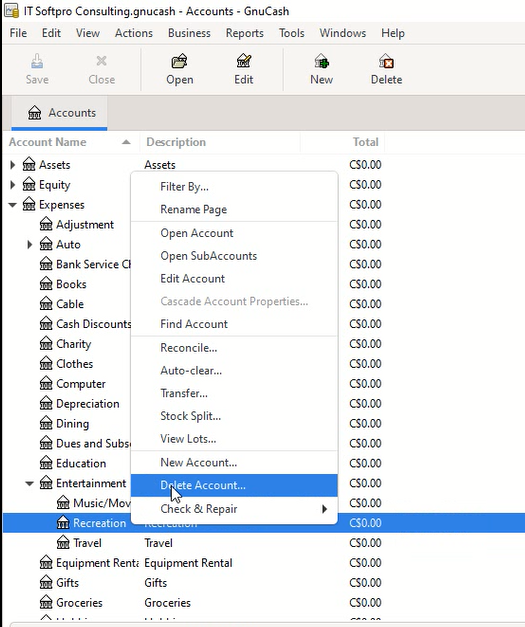
If an account is not needed, it can be deleted by right clicking on the corresponding row and then selecting the “Delete Account…” popup menu option. The following screenshot shows, the “Recreation” account being deleted.
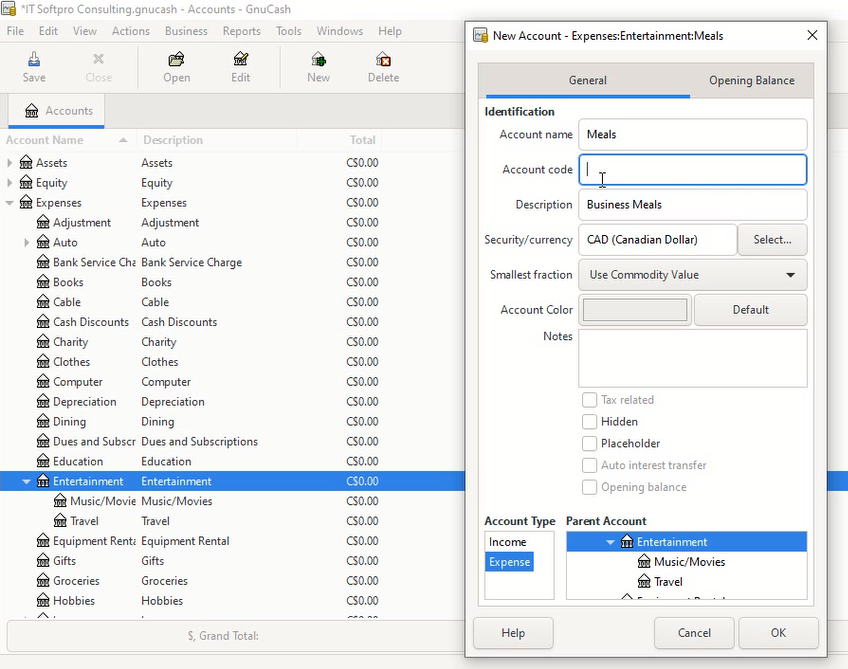
A new account can be added by right-clicking at the parent account and selecting “New Account…” from the popup menu option. A new dialog box will prompt for the details such as the name of account, description, account number, etc. The opening balance can also be entered at the corresponding field at the “Opening Balance” tab. Click OK to finish adding the new account.