“Success is not final; failure is not fatal: It is the courage to continue that counts.” — Winston S. Churchill

 thenthidal | தென்திடல்


The GnuCash application doesn’t have a built-in payroll processing module. However, this is the same scenario as you might encounter when dealing with other commercial accounting /bookkeeping software such as Sage 50 or Quickbooks. In the case of most of the commercial accounting software packages, you might have to pay extra to get the payroll module added.
In the case of GnuCash, the general approach to handle payroll is to calculate the payroll taxes and deductions separately using Excel as well as other tools and then use GnuCash for tracking payroll expenses and liabilities. This will be okay for companies employing a small number of employees (e.g., 1 to 10).
Let us describe how to do this with the help of a small business based in Ontario, Canada. Let us assume that “Joyce Schmidt” and “Jacob Bright” are two fictitious employees of the fictitious company “I.T. Software Professional Consulting”, who receive monthly salaries of CAD 5000 and CAD 2000 respectively. Their payroll tax and deductions can be calculated using Canadian tax authority (CRA)’s online tools. We can keep an Excel spreadsheet which shows the deductions and other details such as how much the company has to contribute, etc. Following picture shows sample data for a month:

The following steps describe how GnuCash is updated with the above payroll information.
1] Let us create the expense accounts to keep track of Gross Payroll expenses, another one to track company contribution to CPP and one more account for tracking company contribution to EI premium.
Expenses:Payroll Expenses:Gross Salary
Expenses:Payroll Expenses:CPP Company Contrib
Expenses:Payroll Expenses:EI Company Contrib

2] We also have to create liability accounts in order to track the amount of payments to be made for taxes as well as for CPP and EI premiums.
Liabilities:Govt Payroll Payments:CPP payable
Liabilities:Govt Payroll Payments:EI payable
Liabilities:Govt Payroll Payments:Govt Tax payable

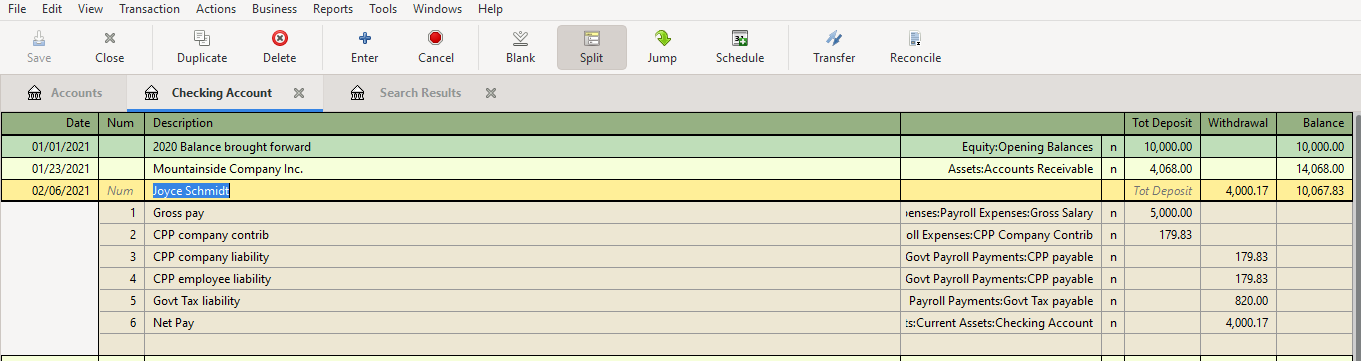
3] Open the checking accounts register and create a new entry for first employee with the name of the employee in the “Description” field. Then, click on split button and then enter the transactions as in the screenshot below. Then click save and then click “Split” icon to compress the transactions to a single row.
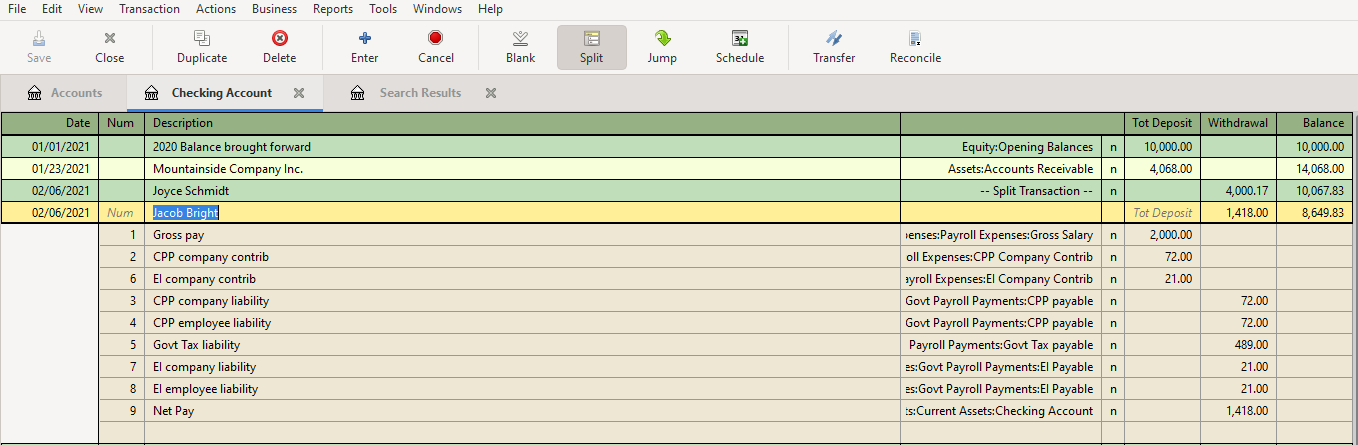
4] Click on the payroll transaction row of employee Joyce (step 3) and click on “Duplicate” button to duplicate the transactions on the next row. Click on the newly created row and then click “Split” icon to open all transaction rows. Edit the rows to update the transactions for the second employee as shown below. Save it.
5] Open the chart of accounts and then take a look at the “Expenses -> Payroll Expenses” to view the total cost to company due to payroll expenses

6] At the chart of accounts, select “Liabilities -> Govt Payroll Payments” to view the liability payments to be made to the tax authority

7] In order to view the payroll information of a specific employee, from the top menu, select Edit -> Find and then type the name of the employee (e.g. Jacob), which will display the details.
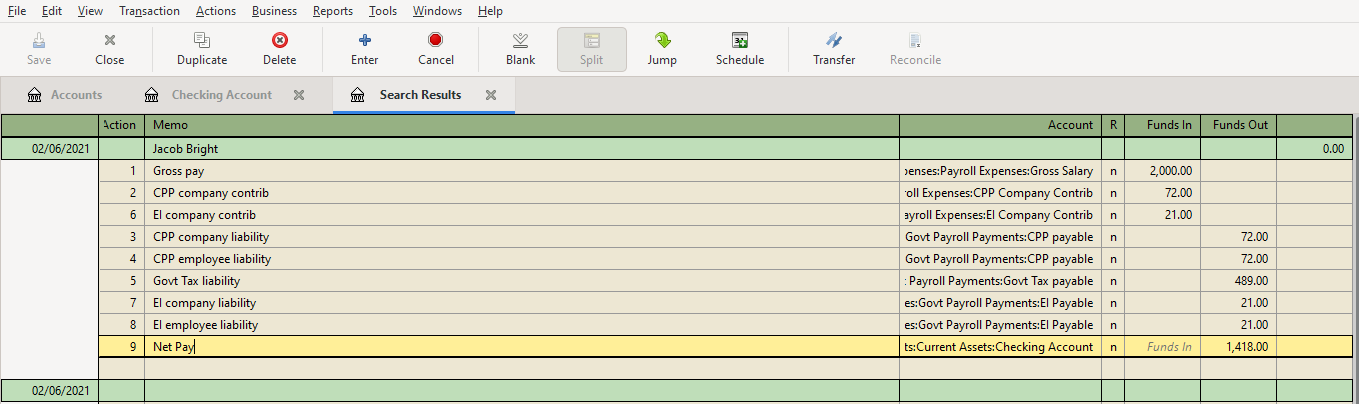
8] With the window of step 7 open, click on “Reports -> Account Report”, to get a printable view of the employee’s payroll information

It is also possible to use the check printing capabilities of GnuCash to print the employee payment check. You might want to take a look at File -> Print check option.

In the previous post, we showed how to synchronize the local repository with the remote repository located at Bitbucket cloud. For that we used a single branch called “master” locally and a branch called “origin/master” remotely. This branch can be shared with other users so that they can also clone the repository and do their work in their machines. Once they are done with their updated files, they can stage, commit and push it to remote branch. However, in a business I.T. development environment with multiple users are working together, it would be better to keep multiple branches. This would keep the work flow streamlined into the different stages a project goes through.
Usually a project starts at the development (DEV) phase, then goes to quality analysis (QA or testing) phase. Once testing is completed, it can move to pre-production (PREPROD) phase and then finally to the production (PROD) phase which is the final destination of the project where it accomplishes its intended purpose. There could be few more additional stages in this type of work flow, but the DEV, QA and PROD are the most commonly used ones.
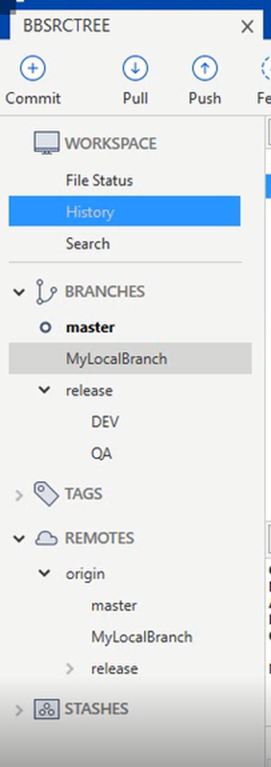
We should also note that when operations team notice any issues with the applications running at production, they might refer back to the developers, which will again trigger another set of development, quality analysis and production phases. The following screenshot shows some of these branches used in a typical environment. In order to keep up with these commonly used phases we can have branches release/DEV, release/QA, master (PROD). Also to keep a personal local branch, we can also have a purpose/task driven name such as “MyLocalBranch” or a branch with a reference number, etc. The following screenshot shows how the branches have been created with our sample scenario.
Let us create a branch locally at sourcetree and then sync to remote (Bitbucket cloud). It is also possible to create branches at bitbucket cloud and then sync them as the local sourcetree branches.
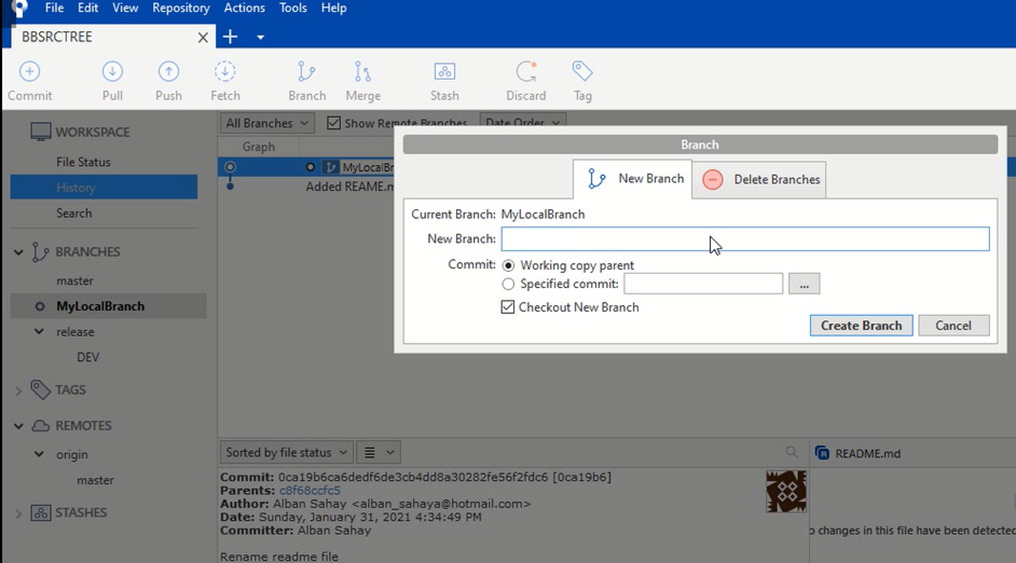
1] At sourcetree window, click on the “Branch” icon in the top. This will open a new popup window “Branch”. Enter the name of the new branch (e.g. MyLocalbranch), make sure to check the option for “Checkout New Branch” is selected and then click on “Create branch” button.
This will create and checkout the new branch. Your folder where the repository is mapped now corresponds to this new branch.
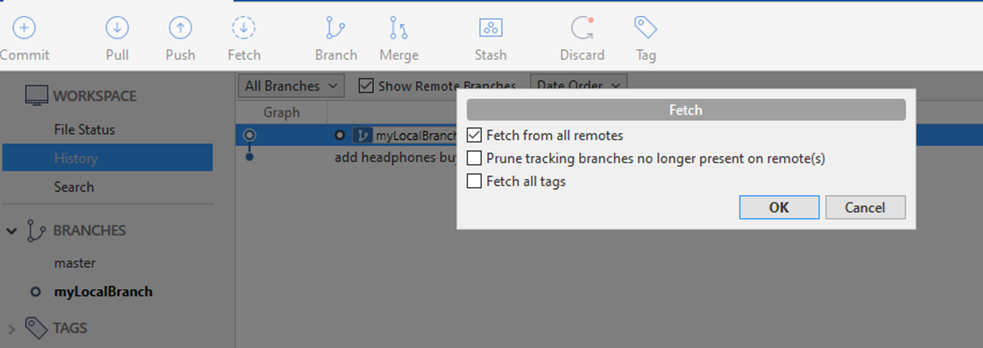
2] Click on “Fetch” button to retrieve the currently existing files from the remote branches.
3] The branches that exist at remote will now appear at sourcetree under REMOTES.
4] Start working with the copies of files at local branch by updating existing files or adding new files as required for the tasks in hand.


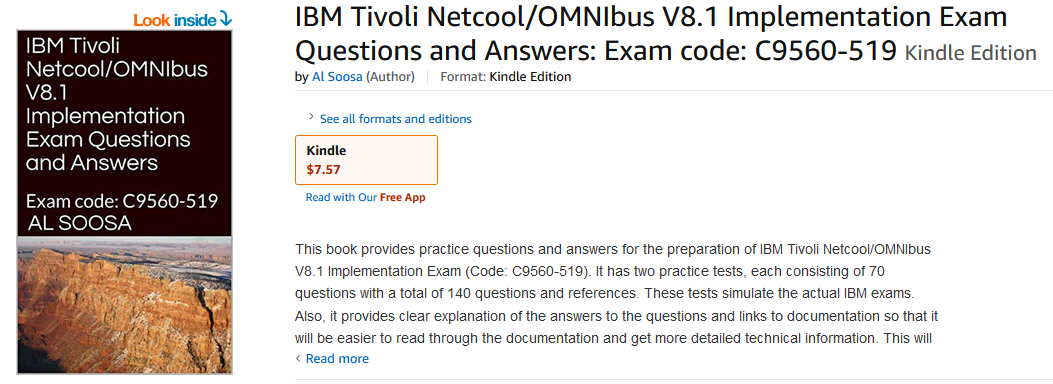
Our new ebook on IBM Tivoli Netcool OMNIbus V8.1 Implementation Questions and Answers has been published as an Amazon kindle ebook.
Our ebook will help in preparing for the IBM Tivoli Netcool OMNIbus V8.1 Implementation exam (exam code: C9560-519). It provides two practice tests each consisting of 70 questions and detailed explanations and links to online documents for getting more detailed technical information.
We are sure this ebook will also help in preparing for interviews for job roles requiring IBM Tivoli Netcool OMNIbus skillset. If you already know about IBM Tivoli Netcool OMNIbus, this book can be used to refresh your knowledge.
Soon, we may announce promotional offers for this ebook.
This ebook is available at the following link :
IBM Tivoli Netcool OMNIbus V8.1 Implementation Questions and Answers

Good News !
We have published our first book on IT Exam preparation as an Amazon kindle ebook.
Our ebook will help in preparing for the IBM MQ v9.1 system administration exam. It provides two practice tests each consisting of 66 questions and detailed explanations and links to online documents for getting more detailed technical information.
We are sure this ebook will also help in preparing for interviews for job roles requiring IBM MQ skillset. If you already know about IBM MQ, this book can be used to refresh your knowledge.
Soon, we may announce promotional offers for this ebook.
This ebook is available at the following link :
IBM MQ v9.1 System Administration Questions and Answers


உலகில் இருக்கும் மரங்களிலே மிகவும் உயரமான மரம் அமெரிக்காவின் கலிபோர்னியா மாகாணத்திலுள்ள “ஹைப்பீரியன்” (Hyperion) தான். 115.7 மீட்டர் (380 அடி) உயரமுடைய இந்த மரத்தின் வயது சுமார் 600 லிருந்து 800 வருடங்கள் இருக்கலாம் என கணக்கிடப்பட்டுள்ளது. இம்மரம் கடற்கரை ரெட்வுட் (redwoods – Sequoia sempervirens) என்ற தாவர வகையைச் சார்ந்தது. காற்றினாலும் மரங்கொத்தி பறவைகளாலும் பாதிக்கப்பட்டாலும், இம்மரம் இன்னமும் வளர்ந்து கொண்டுதான் இருக்கிறது. இதன் துல்லியமான இருப்பிடம் இரகசியமாகவே வைக்கப்பட்டுள்ளது.
கடற்கரை ரெட்வுட் வகையைச் சார்ந்த வேறு சில மரங்களும் ஹைப்பீரியனுக்கு அடுத்த நிலைகளிலுள்ளன. ஹீலியோஸ் என்ற மரம் 114.1 மீட்டரும், இகாருஸ் மரம் 113.1 மீட்டருமாக வளர்ந்து அடுத்தடுத்த நிலைகளில் உள்ளன.
![]()
In these troubled times, it is very important to be prepared, in case ourselves or anyone in the family gets COVID-19. If we could prepare an emergency kit, it could help in fighting against the infection and help with the safety and wellness.
A typical emergency kit could include :
You might also add a month’s supply of essentials such as regular day-to-day medications, children’s pain relievers, pet supplies, etc.
How do you know you have coronavirus?
If you notice these symptoms, quickly take warm water with lemon and drink.
What to do if you get COVID-19 virus ?
The pH for corona virus varies from 5.5 to 8.5. Consuming alkaline food such as those listed below, which have a higher pH value than 8.5 would help in defeating the virus :

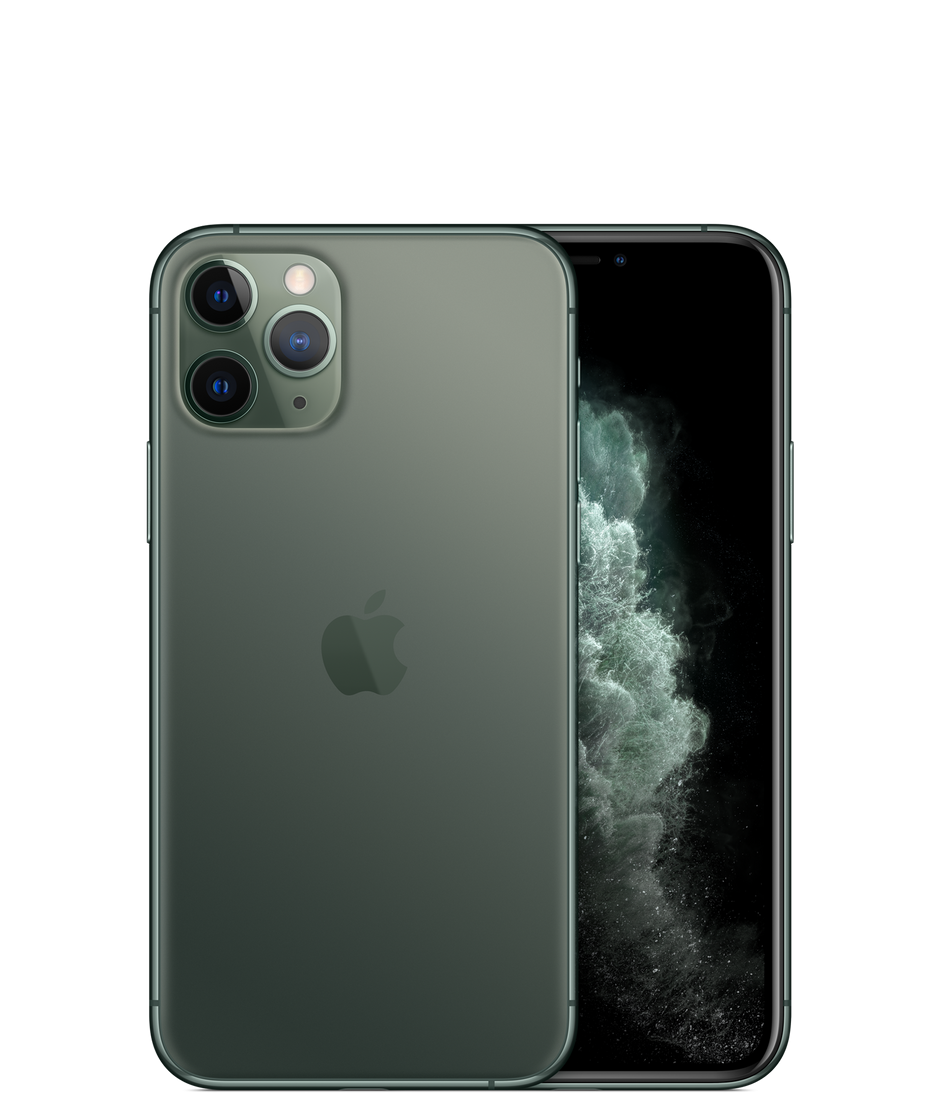

Let us compare the Chinese android phone UMIDIGI Power 3 with Apple’s latest flagship iPhone 11 Pro.
| Feature | iPhone 11 Pro | UMIDIGI Power 3 | Comment |
| Battery Life | 3190 mAh | 6150 mAh | The higher mAh battery size means the battery can generally last for more time |
| Screen Size | 5.8 inches | 6.53 inches | bigger screen is better for internet surfing, live streaming and online TV shows & movies |
| RAM (random access memory) | 6 GB | 4GB | Higher RAM size implies better performance and multitasking ability |
| Weight | 188 gram | 228 gram | Lower weight means, it is easy to carry and hence comfortable |
| NFC | yes | yes | NFC (near-field communication) allows two devices to exchange data between them when brought closer together. |
| GPS | yes | yes | Both have GPS. |
| FM radio | no | yes | FM radio allows listening to favourite radio stations as well as enjoying music on the go with UMIDIGI power 3. |
| Front Camera | 12 MP | 16 MP | Front Camera allows to take your own selfie and do live video calling. More MegaPixels means more details in the image. |
| VoLTE | yes | yes | VoLTE allows voice service (control and media planes) being delivered as data flows within the LTE data bearer. |
| Fast Charging | yes | yes | Fast charging helps to quickly charge the phone |
| Operating System | iOS 13 | Android 10 | |
| Dimensions | 144 x 71.4 x 8.1 mm | 162.1 x 77.2 x 10.3 mm | |
| Materials | Glass, Stainless steel | Aluminium Alloy | |
| Resolution | 1125 x 2436 pixels | 1080 x 2340 pixels | Total number of pixels on the display |
| Pixel Density | 463 ppi | 395 ppi | number of pixels per square inch of the display |
| Display Technology | OLED | S-IPS | The display technologies decide a lot of factors including how it looks, what the brightness can be, the power consumption etc |
| Front video | 3840 x 2160 pixels @ 60 fps | 1920 x 1080 pixels @ 30 fps | This let’s one know the highest resolution they can shoot in and will be in the order of 720×1280 @ 30fps, or 1080×1920 @30fps/60fps and can be lower too depending on the smartphone |
| Rear Video | 3840 x 2160 pixels @ 60 fps | 1920 x 1080 pixels @ 30 fps | Rear camera maximum video recording resolution. This let’s one know the highest resolution they can shoot in and will be in the order of 1080×1920 @ 30fps/60fps, or 4K @30fps/60fps and can be lower too depending on the smartphone. |
| Rear Aperture size | f/1.8 | f/1.79 | The aperture stop of a photographic lens can be adjusted to control the amount of light reaching the film or image sensor. |
| Front Aperture Size | f/2.2 | f/2 | The aperture stop of a photographic lens can be adjusted to control the amount of light reaching the film or image sensor. |